Thursday, February 25, 2010

Happy birthday, Stampin' Addicts!

Hello!

So I hope you enjoyed the Birthday Blog Hop this past weekend!  I created this card in honor of Stampin' Addicts' first birthday, using a little help from Mojo Monday's sketch and colourQ's color combo this week...


Arielle's color picks were Melon Mambo, Regal Rose, Apricot Appeal, and Green Galore.  Green Galore is definitely a color I don't use very much!  I balanced out these bright colors with Basic Black and Whisper White, and my card measures 4-1/4" square.  To create the focal point, I stamped the turtle from Fox & Friends in Green Galore, then added a little cupcake on top of his shell from Crazy for Cupcakes.  The Crazy for Cupcakes stamp set has a pedestal with several cupcakes on it, but I simply stamped and cut one out.  I then colored in the cupcake using the ink pads and Blender Pen.  Too cute!

If you haven't checked out Stampin' Addicts yet, you really should!  It is a positive community for stampers, centered around Stampin' Up!.  Feel free to give me a shout-out over there.. my username is simply Melissa!

See you later!

SA Birthday Card supplies:
Stamps:  Fox & Friends, Crazy for Cupcakes, Vintage Labels
Ink:  Jet Black StazOn, Regal Rose, Green Galore, Melon Mambo
Paper:  Basic Black, Whisper White, Regal Rose, and Green Galore cardstock, Welcome Neighbor Designer Series Paper pad
Accessories/Tools:  Blender Pen, Basic Black Stampin' Write Journaler, Whisper White taffeta ribbon, Vintage Brads, Scallop Circle punch

Wednesday, February 24, 2010

Birthday blog hop projects (lots of pictures!)

Hi!


As promised, I'll be taking a closer look at the projects I showed during the Stampin' Addicts Birthday Blog Hop this past weekend.  First, the card I made:


I used the fun layout from Mojo Monday last week, as well as ColourQ's colors last week.  The cupcake and balloon were paper-pieced with Designer Series Paper from the Pink Flamingo pack, and the cupcake was also watercolored with ink pads and a Blender Pen.  The sentiment was inked up with the Real Red and Brilliant Blue markers and stamped.  I used the coordinating Cupcakes wheel with the Real Red ink pad to create a matching Whisper White envelope.  SU's Whisper White and Very Vanilla envelopes are great for stamping on, with the same smooth surface as the cardstock.  Many of the stamp sets have coordinating wheels, and it just adds the extra little touch to your envelope for your recipient!


Cupcake Celebration card:
Stamps:  Crazy for Cupcakes, On Your Birthday

Ink:  Jet Black StazOn, YoYo Yellow, Real Red and Tempting Turquoise Classic Stampin' Pads
Paper:  Kraft, Brilliant Blue, Whisper White, Real Red, and YoYo Yellow cardstock, Pink Flamingo Designer Series Paper
Accessories/Tools:  Real Red, Tempting Turquoise and Brilliant Blue Stampin' Write markers, Blender Pen, Whisper White satin ribbon, Linen Thread, Pewter Mini Library Clip, Cupcakes wheel, and Scallop Trim Border, 1" Circle and 1-1/4" Circle punches


My next project was the treat holder made with the large cupcake stamp, Simple Birthday Thanks:


If you have seen the image of the stamp in the catalog, you know that it actually has a little "thank you" message in the body of the cupcake.  It was meant for a child to use to make "thank you" cards, with blanks to fill in to personalize them.  Well, I don't see myself needing that part of the stamp, but I just loved the cupcake itself, so when I received the stamp I used my craft knife to carefully cut out the message.  I kept it in case I needed it one day, but now I don't have to worry about only inking the cupcake when I want to use just that part!


I started out the treat holder by stamping the full cupcake in Chocolate Chip Classic ink on Very Vanilla cardstock twice.  I also stamped partial images (using strategic placement of the stamp onto the paper) onto the Old Olive piece of Sweet Pea Designer Series Paper and onto Real Red cardstock.  I cut these out with my Paper Snips (love these for cutting images!) and paper-pieced the image onto the Very Vanilla cupcakes. I colored in the stem of the cherry with my Old Olive marker, and the sprinkles with my Regal Rose marker.  I used a cotton swab to apply Champagne Mist Shimmer Paint to the sprinkles to give an extra little sparkle!  I set these aside while I created the box in between them...


First, start with a piece of cardstock measuring 8.5" x 3".  Score according to the photo below:


Then snip triangles out along the lower scored line to form "flaps", so the box will be easier to put together.  Cut the smallest flap off the left side and place a double-sided strong adhesive (such as Sticky Strip) as shown:


Ok, now the next set of photos I placed in a collage to cut down on the number of photos that needed to load here... 
Remove the liner from your Sticky Strip, and adhere the box sides together.  Use Sticky Strip again to adhere the flaps down, forming your box.  To create a handle for your treat holder, use a Crop-a-dile (or similar; however, the CAD is so easy!) to punch 3/16" holes for Jumbo Eyelets, and set those.  To set the eyelets, I used "A1".  I have a regular CAD, so I'm not sure if it's the same on the Big Bite.


Now, insert your ribbon of choice through the eyelets and tie to create your handle.  Adhere your cupcakes to each side of the box using Sticky Strip, and finish decorating as desired.  I added a picture also to show where the box sits in relation to the cupcakes.  


You can adjust the box size if you want a bigger one - I did not want my box to show past the cupcakes when looking at it from the front.


Cupcake treat holder:
Stamps:  Simple Birthday Thanks
Ink:  Chocolate Chip Classic Stampin' Pad
Paper:  Very Vanilla, Old Olive and Real Red cardstock, Sweet Pea Designer Series Paper pad
Accessories/Tools:  Old Olive and Regal Rose Stampin' Write markers, Real Red polka-dot grosgrain ribbon, Chocolate Chip 1-1/4" striped grosgrain ribbon, Champagne Mist Shimmer Paint, Pewter Jumbo Eyelets, Crop-a-dile, Sticky Strip


Ok, now one last tutorial!  Here is the little box I made that holds an actual cupcake..


This box is very easily made with the SU! exclusive Scallop Envelope Bigz die!  Start by using the die to cut out 4 of these...

Then you will need to cut off the side flaps from two of them (shown in the back):

Adhere all of the envelopes together along the sides as follows: "envelope-envelope with no side flaps-envelope-envelope with no side flaps".  Confusing, I know, but see if you can figure out what I mean from this picture:

You'll see that the envelope on the left has side flaps, and the one on the far right does not.

Ok, next you'll want to use Sticky Strip to adhere the box sides together, then to close the bottom flaps to create your box.

Cut a piece of cardstock measuring 3-1/8" square, and adhere this inside the box bottom.  This will reinforce your box.

Now you can decorate your box as you wish!  I adhered a strip of Sweet Pea Designer Series Paper, then glued the top flaps down over the DSP.  I then tied some Whisper White satin ribbon around the box and created a little tag out of the Modern Label and Word Window punches.


Next, you'll want to create an insert that will hold the cupcake in place.  I cut a piece of Soft Suede cardstock 4-3/4" square, scoring it all around at 3-7/8".  I then used my Circle Scissors Plus to cut a 2-1/4" circle out of the center.  The lines on the glass cutting mat and the Circle Scissors helped me line up my circle perfectly in the center of my cardstock.  Please note that you need to use temporary adhesive on your glass cutting mat to keep the cardstock from moving!

You may find it easier to snip from the edge of the cardstock to the score line to create small flaps to form your insert.  (Ask me if you'd like a picture of the flaps)

At this size, the insert fits perfectly in the box, as does a regular-sized cupcake!

I created a cover out of Medium Window Sheets, but I can't seem to find it.  So when I do, I'll be sure to post that!

Cupcake holder box:
Stamps:  Teeny Tiny Wishes
Ink:  Chocolate Chip Classic Stampin' Pad
Paper:  Kraft, Soft Suede, Whisper White, and Pretty in Pink cardstock, Sweet Pea Designer Series Paper pad
Accessories/Tools:  Whisper White satin ribbon, So Saffron Flower Designer Brad, Scallop Envelope Bigz die, Modern Label and Word Window punches, Sticky Strip


Hope you enjoyed my tutorials!  Please feel free to contact me if you have any questions about anything! :)

Blog candy winner!

Good morning!

I was at first writing a post with instructions for how to create my blog hop projects from this weekend + the blog candy winner.. but the post was getting way too long!  :)  So I'm breaking it up into two posts.. here is what the lucky winner will receive:
These are the new Chocolate Chip 1/4" epoxy brads from the Occasions Mini catalog!  They're so cute and fun!  There are two designs - a flower and stripes, and there are 8 of each in the package.  And now for the winner, courtesy of Random.org...


And comment #37 was....


Allison said...


Fabulous projects! I love both of the cupcake boxes--so cute!
Yay, Allison!  Congratulations!  Please email me by the end of the week with your address and I will get those out to you. 

I enjoyed reading about your favorite birthday treats!  Thanks for sharing them with me!


Check back later for the projects!

Tuesday, February 23, 2010

Circle journal - 3 favorite book characters

Hi!  I finished my layout and sign-in book for Paula's circle journal.  Sorry it's a day late!  All of the pictures I used on my layout were found through Google.

Here are the two pages together:


And here is the first page by itself:


And the second:


I set my cutting mat behind the pages, which ended up making them better-focused when taking the pictures - yay!

If you've never read these books, I recommend them - especially the Shopaholic series if you're looking for some fun reading.  Kahlan Amnell is one of the main characters in the Sword of Truth series, which is a fantasy series that I had read since the beginning.  They made the first few books into a TV series that is currently on air called "Legend of the Seeker".  Long books, but I enjoyed them.  And yes, I did get into the Twilight saga.. I actually have not read the fourth book yet, as I'm waiting for the paperback edition.  My last favorite character is from the Shopaholic series.  The first book, Confessions of a Shopaholic, was made into a movie a while after I read all of books in the series.  The author, Sophie Kinsella, is very good at producing books with a nice light-hearted feel.. one of those feel-good books. :)

I don't yet have an alphabet stamp set with small enough letters, so I created part of the title in SU's My Digital Studio ("my 3 favorite") and printed it.  "My" and "favorite" are from the Just Perfect Alphabet stamp set, and the "3" is from the Schoolbook Serif Numbers stamp set (resized to fit my title).  I then used the "real" stamp set Calendar Alphabet & Numbers to stamp "book characters" in Soft Suede ink.  The "stitching" is a rub-on from A Perfect Day rub-ons (retired).

3 favorite book characters layout supplies:
Stamps:  Great Friend, Just Perfect Alphabet (MDS), Schoolbook Serif Numbers (MDS), Calendar Alphabet & Numbers
Ink:  Taken with Teal and Old Olive (MDS), Old Olive, Soft Suede and Rose Red Classic ink, Chocolate Chip wheel cartridge
Paper:  Going Gray, Whisper White, Kraft, and Chocolate Chip cardstock, Sweet Pea Designer Series Paper pad, The Write Stuff Specialty Designer Series Paper
Accessories/Tools:  Rose Red and Chocolate Chip Stampin' Write markers, Always in Bloom wheel, Linen Thread, A Perfect Day Rub-ons (retired)

And here's my book for Paula's sign-in page...


I free-hand drew the book!  I was pretty proud of myself, haha.  There's a little piece of printer paper for the "pages", and I lightly drew lines with a pencil to make it look more like there were pages there, smudging the lines a little.  What do you think?


Sign-in book tag supplies:
Paper:  Kraft cardstock, printer paper
Accessories/Tools:  Taken with Teal Stampin' Write marker, Basic Black Stampin' Write Journaler, pencil

Hope you like them, Paula!

Saturday, February 20, 2010

Stampin' Addicts Birthday Blog Hop!


Hello, and welcome to the Stampin' Addicts Birthday Blog Hop!  This weekend we will be celebrating Stampin' Addicts' first birthday by showcasing birthday-themed projects.  Stampin' Addicts is a free website dedicated to supporting Stampin' Up! stampers and demonstrators alike. Our motto is "Positively Creative! Positively Stampin' Up!"  If you have not been to Stampin' Addicts, you should check them out as soon as you finish the Birthday Blog Hop!  And be sure to give me a shout-out (known as "Melissa" on SA) - I'd love to see you there!  This weekend Stampin' Addicts is also having a STAMP JAM, with Challenges, Stampin' and lots of Inspiration!

If you have been following the hop in order, you probably just came from Dawnmarie's blog, where she showed you a lovely gift ensemble suitable for females.  Didn't you just love her projects?  They're so gorgeous, I'd love to receive them as a gift myself!  If this is your first stop, don't worry... the blogs are linked in a full circle, so you can find your way around!

I am featuring cupcakes in my projects!  I just love cupcakes.. somehow they just appeal to me more than cakes (although I love cakes too!).  Maybe because they're so cute!

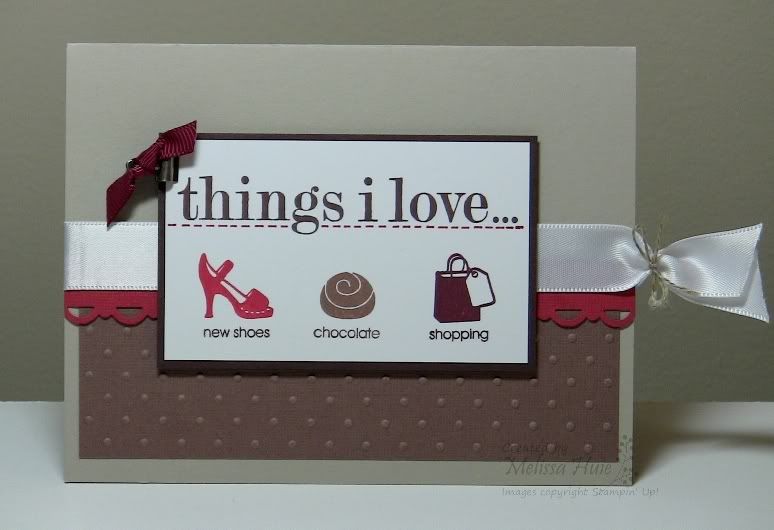
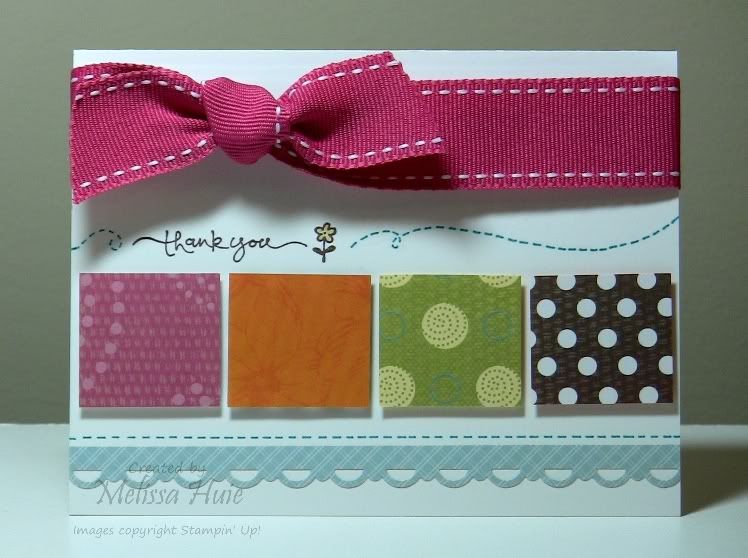
Here is my first project, a card inspired by ColourQ's color and Mojo Monday's sketch challenges this week:


I love the colors, they're so bright and cheery!  Perfect for a birthday card, and particularly a masculine one!  To reinforce that masculinity, I added a little Pewter Mini Library Clip on the side. ;)  I also created a matching envelope by using the coordinating Cupcakes wheel.

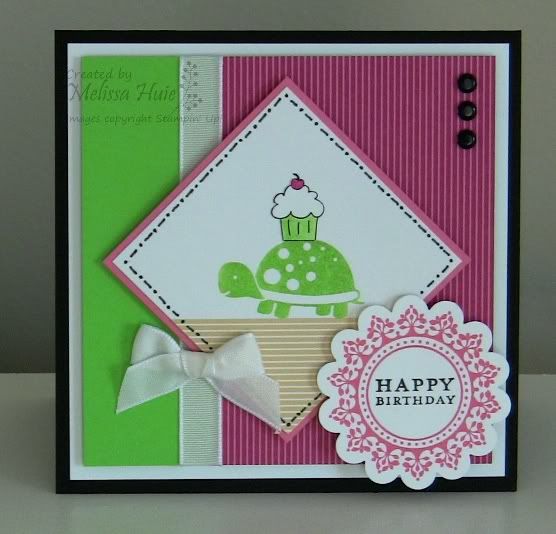
My next project is a little treat holder using the Simple Birthday Thanks stamp.  As soon as I saw this stamp in the catalog, I knew I had to have it!


This little cutie would be fantastic as a party favor, a treat holder for a gift, or really anything you want!  There is a little box in between the cupcakes to hold the goodies, and Jumbo Eyelets hold the ribbon in place for a handle.  It is a little hard to tell from the picture, but the sprinkles sparkle with the help of a little Champagne Mist Shimmer Paint (which is still available to order through your demonstrator, by the way).

And finally, I have a cute little cupcake holder box.. yes, to hold an actual cupcake!  :)


I made a top for it out of our window sheets, but apparently left it out of the photo.  There is also an insert that holds the cupcake securely in place.  Check back on Wednesday for a view of those and more info on this and my other projects!

Now, I have a special little treat for you!  Leave a comment below telling me what your favorite birthday treat is, and I'll put you in my drawing for a package of the new Chocolate Chip Epoxy Brads from the Occasions Mini!  Come back on Wednesday (February 24th) to see if you've won, as well as to check out how I created my projects above.

Your next stop is Marie's blog, where she has fabulous birthday ideas for a little girl.  I just love all of her projects, especially the first one!  Enjoy the hop, and thanks for stopping by!

--------
Recipes:


Cupcake Celebration card:
Stamps:  Crazy for Cupcakes
Ink:  Jet Black StazOn, YoYo Yellow, Real Red and Tempting Turquoise Classic Stampin' Pads
Paper:  Kraft, Brilliant Blue, Whisper White, Real Red, and YoYo Yellow cardstock, Pink Flamingo Designer Series Paper
Accessories/Tools:  Real Red, Tempting Turquoise and Brilliant Blue Stampin' Write markers, Blender Pen, Whisper White satin ribbon, Linen Thread, Pewter Mini Library Clip, Cupcakes wheel, and Scallop Trim Border, 1" Circle and 1-1/4" Circle punches

Cupcake treat holder:
Stamps:  Simple Birthday Thanks
Ink:  Chocolate Chip Classic Stampin' Pad
Paper:  Very Vanilla, Old Olive and Real Red cardstock, Sweet Pea Designer Series Paper pad
Accessories/Tools:  Old Olive and Regal Rose Stampin' Write markers, Real Red polka-dot grosgrain ribbon, Chocolate Chip 1-1/4" striped grosgrain ribbon, Champagne Mist Shimmer Paint, Pewter Jumbo Eyelets, Crop-a-dile

Cupcake holder box:
Stamps:  Teeny Tiny Wishes
Ink:  Chocolate Chip Classic Stampin' Pad
Paper:  Kraft, Whisper White and Pretty in Pink cardstock, Sweet Pea Designer Series Paper pad
Accessories/Tools:  Whisper White satin ribbon, So Saffron Flower Designer Brad, Scallop Envelope Bigz die, Modern Label and Word Window punches

Wednesday, February 17, 2010

Things that make me happy!


Hi!  My friend Marie awarded me with the Happy Award (I guess that's what it's called, lol), so I'm to tell you 10 things that make me happy, and pass it on!  Here they are, in no particular order...

1.  Spending time with Seth
2.  Stamping or making crafty stuff
3.  Spending time outside
4.  Really good coffee :)  my two favorites are both Starbucks, which I brew at home.. Caffè Verona and Sumatra
5.  Fall - my favorite season
6.  Traveling to new places
7.  Meeting new people and making new friends
8.  Getting things in the mail (other than bills and junk mail :) )
9.  A good red wine (favorites are Cabernet Sauvignons and Merlots, although I like to try new ones and multi-varietals).. I like a glass every now and then
10. Good, nourishing food

Haha, yes, I apparently love to eat and drink!  Ok, so that gave you a little peek (other than my Honest Scrap Award here) into my "real life".  So those of you I list, please don't feel like you have to do this, only if you want to!  Like Marie said, also please don't feel left out, because I wish I could tag all of my friends.. but to keep it fairly short, I'll only tag 3:

Serene
Susan
Jenn

Don't forget that this weekend (starting Saturday at 12 noon EST) is the Stampin' Addicts Birthday Blog Hop!  Come celebrate with us as we showcase birthday-themed projects, and make sure you stop by everyone's!  Some are offering blog candy, including myself.

Tuesday, February 16, 2010

Circle journal - 4 must-have items while traveling

Hello!

Here is my layout for Kathi's circle journal, highlighting my 4 must-have items when traveling:


I need to figure out the best way for me to photograph scrapbook layouts, because I just feel like the picture could be better!  It was necessary for me to shoot them together though, since I "crossed the crack" between the pages with a photo.  Kathi, I promise it looks better in person. :)

Scrapbook layout supplies (8x8):
Stamps:  Taffy Alphabet, Medallion, Totally Tabs, and Vintage Labels
Ink:  Soft Suede, Old Olive, Melon Mambo, Bermuda Bay, and Pumpkin Pie, VersaMark
Paper:  Bermuda Bay, Melon Mambo, Soft Suede, Kraft, Old Olive, and Whisper White cardstock, Sweet Pea Designer Series Paper pad, die-cut from The Write Stuff Specialty Designer Series Paper pack
Accessories/Tools:  Scallop Trim Border, Scallop Circle and Round Tab punches, Pumpkin Pie 1/4" grosgrain ribbon, clip from Clips Assortment, white embossing powder, and Soft Suede, Melon Mambo, Old Olive, and Bermuda Bay Stampin' Write markers

Kathi requested that we make a piece of luggage as our sign-in tag for her circle journal, so here's mine:


A lot of you will recognize the photo, since I use it as my avatar. :)  It was taken on top of a mountain we hiked up in Salt Lake City a couple of summers ago.  I created the... "straps", I guess? ... with the Modern Label punch and Antique Brass Brads from the Vintage Brad pack.  Of course, I had to include my little butterflies!  I'm not sure if you can see it very well, but I stamped the postmark image from Winter Post in VersaMark.

Luggage Tag supplies:
Stamps:  Winter Post
Ink:  VersaMark, Soft Suede
Paper:  Bashful Blue, Old Olive, Whisper White, Kraft, and Bermuda Bay cardstock
Accessories/Tools:  Modern Label punch, Antique Brass brads (Vintage Brads), Linen Thread, Beautiful Wings Embosslits die, Basic Black Stampin' Write Journaler, Paper Piercing Tool, Stampin' Sponge

Hope you like my contribution, Kathi!  :)

Monday, February 15, 2010

Vintage Friends

Good morning!

There was another Featured Stamper Challenge issued, this time focusing on the crazily-talented Janine Tinklenberg (JanTink).  The card I chose of hers was this one:


Gorgeous, right?  I tell you, my hands-down favorite In Color this year is Rich Razzleberry!  Here's my version of her card:


I really adored her whole card, so I kept a lot of the elements the same.  I don't have the Very Vintage jumbo wheel yet, though, so I used the It's Beautiful jumbo wheel with the Melon Mambo ink pad.  I changed the stripes to polka dots on mine - I love doing tone-on-tone stamping.. in this case the polka dots are stamped with Basic Gray ink on Basic Gray cardstock.  I created the tag on the ribbon by punching Kraft cardstock with the Word Window punch, then punching it again to make it shorter.  It was then stamped with the vine image from Vintage Vogue and tied to the ribbon.  Doesn't Melon Mambo just look fabulous stamped on Blush Blossom?

Thanks for stopping by!  Be back soon with circle journal pages!

Vintage Friends card supplies:
Stamps:  Vintage Vogue, For All You Do
Ink:  Melon Mambo, Chocolate Chip, Basic Gray
Paper:  Kraft, Basic Gray, Melon Mambo, Blush Blossom, Whisper White, and Old Olive cardstock
Accessories/Tools:  It's Beautiful jumbo wheel, Vintage Brads, Chocolate Chip 1-1/4" striped grosgrain ribbon, Linen Thread, Beautiful Wings Embosslits die, and Word Window, Eyelet Border and Scallop Trim Corner punches

Saturday, February 13, 2010

Things I Love...

Hi there!

I've had this stamp set for a little while, and hadn't used it.  I think it's a great set to use for a Valentine's card, or just to say "I love you".  It doesn't even have to be for a significant other.. it could be for your mom, sister, friend, etc.

Stamping 411 has another sketch up, and that is what I used for this card:


Isn't it cute?  I inked up each image carefully with the ink pads, then colored the words on the stamps with my Chocolate Chip marker.  The panel at the bottom is embossed with the Perfect Polka Dots Textured Impressions folder.  Not much else to describe, other than that I added faux stitching with the Ruby Red marker, and the little Pewter Mini Library Clip in the corner has Bravo Burgundy 1/4" grosgrain ribbon tied on it.  Oh, and the Whisper White satin ribbon was cinched with some Linen Thread tied into a bow.  Love this set and all of my little accessories!

My stamping buddy Mary inspired me to decorate the inside of my card - I normally don't for some reason.  I guess I didn't want to limit myself when it comes time to write in it!  It gives it such a nice extra touch though, and I think I'll be doing this more often.  Here's the inside:


I stamped the heart first by inking the stamp with Ruby Red, then "stamping off" on scratch paper to make it a little lighter, then stamped the sentiment in Chocolate Chip.

Happy Valentine's Day to all of you!  Hope you get to spend the day with someone you love.

Things I Love card supplies:
Stamps:  Things I Love
Ink:  Chocolate Chip, Close to Cocoa, Bravo Burgundy, and Ruby Red
Paper:  Sahara Sand, Ruby Red, Close to Cocoa, Chocolate Chip, and Whisper White cardstock
Accessories/Tools:  Whisper White satin ribbon, Bravo Burgundy 1/4" grosgrain ribbon, Linen Thread, Pewter Mini Library Clip, Ruby Red and Chocolate Chip Stampin' Write markers, Perfect Polka Dots Textured Impressions folder, and Scallop Trim Border, Scallop Circle, 1-3/8" Circle, and 1-1/4" Circle Punches

Friday, February 12, 2010

Circle Journal - sign-in page

Hi!

I have finished and uploaded my sign-in page for my circle journal.  This is where I will put everyone's tags to show the contributors.  CJ ladies - please don't feel like you have to work within any constraints from my color scheme.. I tried to keep it fairly neutral.  I only ask that you pick an adjective that you would use to describe yourself, then interpret that to make a tag that reflects you.  I am almost done with my tag, but wanted to get the layout up on my blog.


The cardstock looks black in the photo for some reason, but it's really Chocolate Chip.  In case you were wondering, I stamped the title with the Jumbo Outline Alphabet, then colored in the letters with a Blender Pen and ink pads.  I left the overlapped parts white though.

Thanks for visiting!

Sign-in page supplies:
Stamps:  Jumbo Outline Alphabet
Ink:  Tempting Turquoise, Chocolate Chip, Old Olive
Paper:  Sahara Sand, Chocolate Chip and Whisper White cardstock, Sweet Pea Designer Series Paper pad
Accessories/Tools:  Sweet Pea Stitched Felt, Tempting Turquoise 1/4" grosgrain ribbon, Tempting Turquoise button from Playground Designer Buttons pack, Linen Thread, Scallop Trim Border punch, Spiral punch, Blender Pen

Thursday, February 11, 2010

BOLO - Upcoming blog hop!


"Be On The Lookout" and mark your calendars!  One of my favorite hangouts, Stampin' Addicts, is having its first birthday this month!  To celebrate, I'll be joining 24 talented stampers in showcasing birthday-themed projects February 20th and 21st.  I'll be giving away some blog candy too, so you won't want to miss it!

Wednesday, February 10, 2010

Clean and Simple Butterflies

Hello!

Today's card is a clean and simple one.  Arielle's colors this week were inspired by this photo:


They're such lovely colors, aren't they?  To create my card, I used this week's sketch challenge at Splitcoaststampers...


Very clean and simple, right?  This card took little time to make with the help of my Big Shot.  I created the texture on the Blush Blossom cardstock with the Perfect Polka Dots Textured Impressions folder, and the butterflies are from my favorite Beautiful Wings Embosslits die.  Easy-peasy!  :)

Sorry about the excessive usage of Whisper White satin ribbon lately.. I just love satin ribbon, and I'm hurtin' for some of the new colors in the Occasions Mini.. soon I will order some!

Have a great day!

Supplies:
Paper:  Chocolate Chip, Blush Blossom, Regal Rose, and Whisper White cardstock
Accessories/Tools:  Beautiful Wings Embosslits die, Perfect Polka Dots Textured Impressions folder, Linen Thread, Whisper White satin ribbon

Tuesday, February 9, 2010

Butterfly Fields

Good evening!

My friend Marie has another inspiration challenge up on her blog.  Here is her source of inspiration this week (from this site):


There is also a new Saturday Sketch Challenge over at Stamping 411, which I used in creating my card...


I was inspired by the colors in the photo, and they just felt like spring/summer to me.. so thus, my theme.  :)

My panel was a little too tall, so I overlapped the ribbon a bit.  I stamped the grass image from Inspired by Nature in two different colors - Certainly Celery and Garden Green.  I added some flowers in Rose Red and Pumpkin Pie from the Flight of the Butterfly set, which is also where the sentiment and butterfly comes from.  The butterfly is actually two stamps - the filled-in part, and the polka dots are separate stamps.  After inking up the filled-in stamp in Melon Mambo, I stamped off on scratch paper before stamping on my cardstock.  The polka dots were stamped normally with Melon Mambo.  To add more interest, I tied a corduroy button around the bow after tying.

Thanks for visiting!  I'm off to finish off my circle journal sign-in pages.  Please stop on by Marie's blog if you get a chance.. she'd love for you to play along!

Supplies:
Stamps:  Flight of the Butterfly, Inspired by Nature
Ink:  Tempting Turquoise, Pumpkin Pie, Rose Red, Garden Green, Certainly Celery, Melon Mambo
Paper:  Soft Suede, Kraft, Tempting Turquoise, and Whisper White cardstock
Accessories/Tools:  Whisper White satin ribbon, Pumpkin Pie corduroy button, Linen Thread, Scallop Trim Border and Corner punches

First Circle Journal Layout

Hi!

I finally finished my first layout for my circle journal!  It's pretty late here, so I can't write much right now.  Here are both pages together:


Here's the first page by itself:


And the second page:


I couldn't get the colors exactly right in the photos, probably because of the time of day when taking them.  :)  They look a lot better IRL!  I'll see if I can get some better pictures when it's daylight outside.

I should have my sign-in pages up later today as well!

Supplies:
Stamps:  Vintage Vogue
Ink:  Chocolate Chip, Rose Red and Old Olive Classic Stampin' Pads
Paper:  Chocolate Chip, Whisper White and Old Olive cardstock, Sweet Pea Designer Series Paper pad, The Write Stuff Specialty Designer Series Paper (journaling die-cut)
Accessories/Tools:  Rose Red, Old Olive and Chocolate Chip Stampin' Write markers, Chocolate Chip buttons from the Button Latte pack, Linen Thread, Pretty in Pink taffeta ribbon, Half-back Pearls from the Pretties Kit, Wire Clip from the Clips Assortment pack, Little Leaves Sizzlits die, Scallop Trim Border punch

Sunday, February 7, 2010

Thank You Squares

Hi!

I decided to play along again with this week's Featured Stamper challenge.  Ilina Crouse's work is featured this week.  I was inspired by this card:


I loved the layout of this, and the whimsical line drawn across with the sentiment.  Here's my take on it:


I changed the base card color, the Designer Series Paper used for the squares, color scheme.. well, I changed a lot, and kept the basic layout and the doodling line across the center.  :)

After stamping the sentiment, I also stamped a flower from the same set to mimic the heart from the original card.  I drew in the "stitched" lines with my Taken with Teal marker.  Various squares were cut from the Sweet Pea Designer Series Paper pad and adhered with Stampin' Dimensionals.  Paper from the same collection was also punched and adhered along the bottom.  I just love the clean look of the card!

I'll have my circle journal pages up tomorrow.. I have to re-develop a couple of photos, as they were messed up and I didn't look at them before leaving.. stay tuned!

Thank You Squares:
Stamps:  Short & Sweet
Ink:  Chocolate Chip Classic Stampin' Pad
Paper:  Whisper White cardstock, Sweet Pea Designer Series Paper pad
Accessories/Tools:  Rose Red 1" double-stitched grosgrain ribbon, Scallop Trim Border punch, Taken with Teal, Old Olive and So Saffron Stampin' Write markers

ColourQ Challenge #18 - Love Birds

Good morning!

I was having a little trouble figuring out what I wanted to do with the colors in Arielle's colourQ challenge this week, but I finally came up with something!  Here are the colors:


And here's my card:


Baja Breeze was one of my favorite In Colors from last year.  Doesn't the side piece look like Baja Breeze?  It's actually from the new Sweet Pea Designer Series Paper pad!  (Psst.. Baja Breeze and the other In Colors from last year are available in My Digital Studio!)

I paper-pieced the birds on DSP from the Welcome Neighbor pad, and the beaks were colored in with So Saffron and a Blender Pen.  The hearts on the side were stamped with VersaMark and heat-embossed with white embossing powder.

Well, there was my go at it.  You should play along!  :)  

By the way, I'm going to try something different with the "ingredients" list, to help with ease of reading.  Have a great Sunday!

Love Birds card:
Stamps:  Love You Much, Short & Sweet
Ink:  Jet Black StazOn, Melon Mambo Classic Stampin' Pad, VersaMark
Paper:  Melon Mambo, Whisper White and Old Olive cardstock, Sweet Pea Designer Series Paper pad, Welcome Neighbor Designer Series Paper pad
Accessories/Tools:  Whisper White taffeta ribbon, Vintage Brads, White Embossing Powder, Mat Pack, Paper Piercing Tool, Pinking Hearts Border, Small Heart, Modern Label, and Word Window punches

Friday, February 5, 2010

Fresh Floral Birthday

Happy Friday!

My friend Marie has another inspiration challenge (click here to visit her blog and play along), and this one is also right up my alley.  I love fresh and airy rooms, and this one is no exception.  She found this picture on the Traditional Home website:


Gorgeous!  The color scheme is exactly how I would want my kitchen/breakfast nook to look (hehe, "nook to look").  Anyway, I was inspired by the colors and clean, airy feel.  When I think of these words, the stamp set Fifth Avenue Floral immediately comes to mind.  Here's my card, which also uses Stampin' Addicts Sketch Challenge #40 (I turned it sideways):


I first stamped the rose on Whisper White, then masked it with some scratch Grid Paper (stamp the rose again on scratch paper, trimming it and using temporary adhesive to attach it over your image on the cardstock).  I then stamped the other flowers to either side.  I keep this mask in my stamp set's box for easy access.  Watercoloring with the ink pads and Blender Pens really brings out the beauty of the flowers!  I also simply adore these punches (if you haven't noticed!) - it's so easy to create any size you want with the border and corner punches.

Don't you just love how Sahara Sand ink looks with the Kraft?  Almost a perfect match!  And you can never have too many birthday cards, right?

Fresh Floral Birthday card:  Fifth Avenue Floral and Well Scripted stamp sets; Jet Black StazOn ink; Bashful Blue, Sahara Sand, Certainly Celery, and Crushed Curry Classic Stampin' Pads; Kraft, Basic Black, Whisper White, and Certainly Celery cardstock; Sweet Pea Designer Series Paper; Filigree Designer Brads; Vintage Brads; Whisper White satin ribbon; Scallop Trim Border and Corner punches

Thursday, February 4, 2010

PPA28 - Emerging Medallion

Hello!

I explored a new (well, to me) technique today called Emerging Color/Emboss Resist.  The Medallion stamp is just perfect for this technique, and I had to try it out after seeing Mary Brown's gorgeous card with it.  I used the colors for this week's Pals Paper Arts Challenge: Melon Mambo, Pretty in Pink, and Basic Black.


How pretty is that?  First I inked up my Medallion stamp using VersaMark, then stamped on a sheet from the Welcome Neighbor Designer Series Paper pad, embossing with clear powder.  I then rolled Melon Mambo ink with my brayer over the sheet until it was as dark as I wanted it.  Next, I wiped the Medallion with towel - when you do this, the DSP just "emerges", and you can see the Pretty in Pink patterned paper through the embossed Medallion.  The card was finished off with a sentiment from the Whimsical Words stamp set, and a heart punched with the Small Heart punch.

I just love this technique.  I already have some more ideas for it!

Thanks for visiting!

Emerging Medallion card:  Medallion stamp and Whimsical Words stamp set; Melon Mambo Classic Stampin' Pad; Jet Black StazOn ink; VersaMark ink; Melon Mambo, Whisper White, Basic Black, and Pretty in Pink cardstock; Welcome Neighbor Designer Series Paper pad; Scallop Oval, Large Oval and Small Heart punches; Whisper White satin ribbon; clear embossing powder; brayer