
Friday, December 24, 2010
Merry Christmas!
Hello everyone! I just wanted to wish you all a Merry Christmas and a Happy New Year! I hope you are able to spend time this holiday season with those you love. ♥

Friday, December 10, 2010
My inspiration board, at the moment
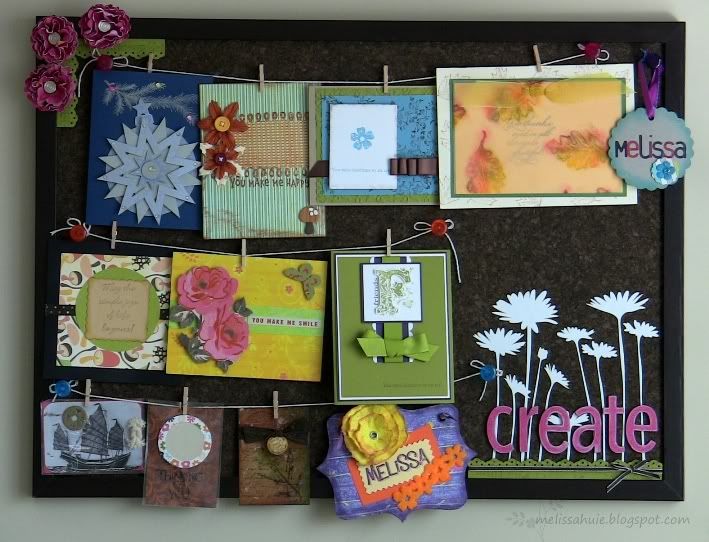
Ah... look at my pretty little board of love from friends. :)
I think I need a bigger board!
I was trying to think of a way to display items made by my scrappy friends on my board, without damaging them. I suddenly had this idea last night, and promptly climbed onto my desk to recreate my vision... haha!
I had these little clothespins for quite a while, as I wanted to some day make an organizer like a Clip It Up... I also already had the twine, and some old push pins. Not sure if I like the push pins the way they are.. I might cover the heads with fabric... yes, that sounds like a good idea!
(The last ATC there was one I had made for a local swap...)
Tuesday, December 7, 2010
PCS December 2010 - Winter's Tale
Hi there!
I just wanted to let you know that on December 10th, Paper Crafters Sampler will be releasing the December 2010 issue! This month's issue is called "Winter's Tale" and features a variety of beautiful winter-themed projects.
Here's a sneak peek of my project:

If you'd like to subscribe, head on over to the Paper Crafters Sampler website, and be sure to note the code "PCSMH"!
I just wanted to let you know that on December 10th, Paper Crafters Sampler will be releasing the December 2010 issue! This month's issue is called "Winter's Tale" and features a variety of beautiful winter-themed projects.
Here's a sneak peek of my project:
If you'd like to subscribe, head on over to the Paper Crafters Sampler website, and be sure to note the code "PCSMH"!
Sunday, December 5, 2010
My Christmas Wreath
Hello!
I knew I wanted to make my own Christmas wreath this year (although I've never made or bought one before), and had many different ideas on how to go about doing it. I toyed with a few different wreath bases in my head for a while, and the one that I kept going back to and finally decided upon was this ruffled wreath made by Emily Jones of Jones Design Company. I was drawn to its natural feel. I pretty much followed her tutorial, using a 10" styrofoam wreath from a dollar store, and burlap bought by the yard. Then I just spiffed it up!
Here's the end result! I absolutely love it!
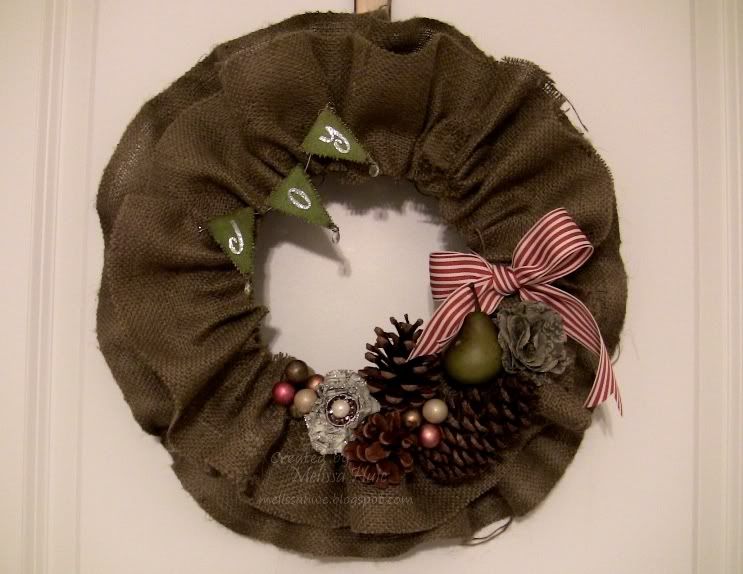
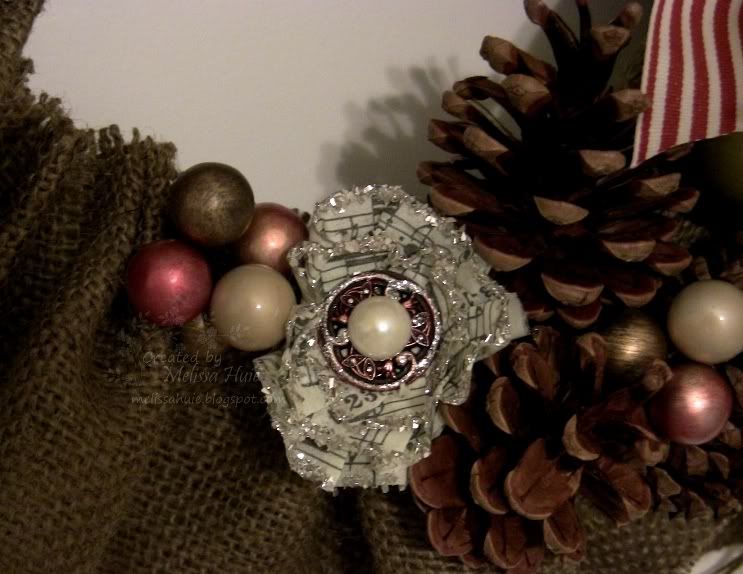
I used a few things from my stash, and some wreath adornments found at the local craft store. The pinecones are those ones that smell like cinnamon... yum!

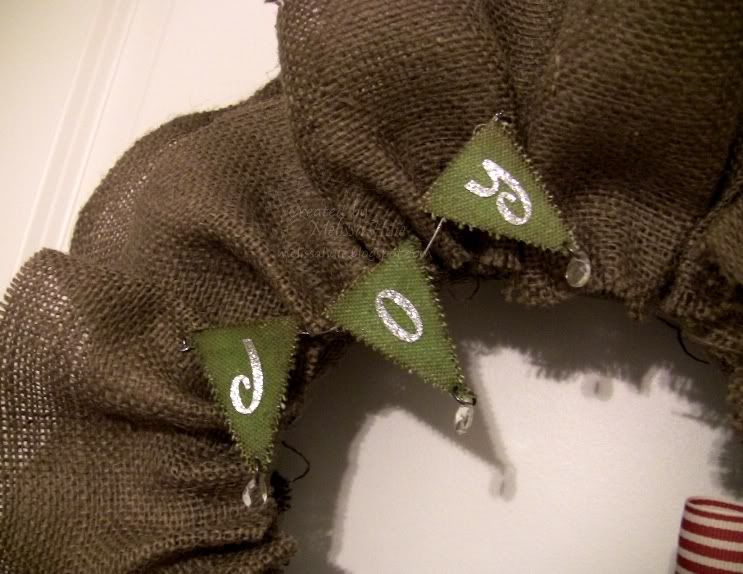
Love how the banner turned out! After I made each pennant, I hot-glued it to the retired silver elastic cord, and hand-sewed it onto the wreath.
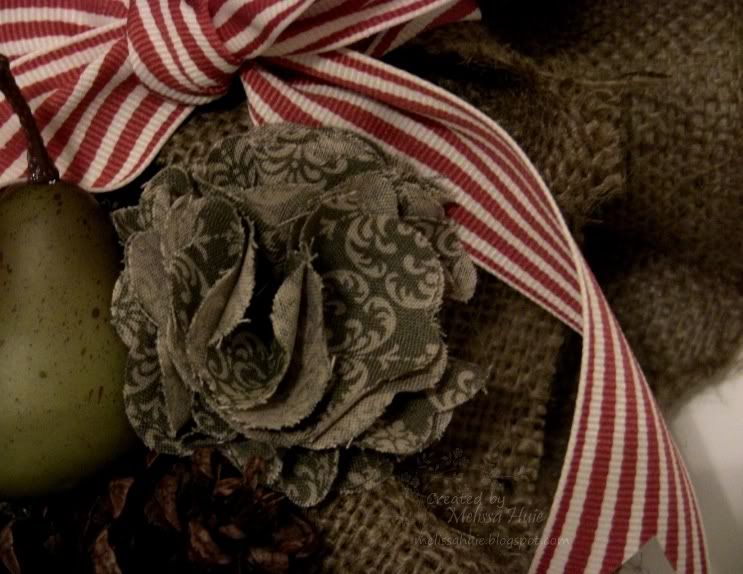
I made the pretty little flower below out of the Deck the Halls Designer Series Fabric (SO glad I have two more packages on the way.. I love this stuff!)... I just die-cut some flowers using the retired Flower Layers #3 Big Shot die, folded and layered them, then sewed them together and onto two unfolded layers of flowers. I sewed this as well to the wreath.
And here's how it looks on our door! You'll have to excuse the lighting, as the sun had already set.. :) Maybe I'll try and take another photo in the morning.

Well, I gotta go.. think I'll make myself some hot chocolate! It has been snowing a little bit off and on, and it's quite cold out. Hope you are staying warm where you are, and thanks for stopping by! :)
I'm linking this here:

I knew I wanted to make my own Christmas wreath this year (although I've never made or bought one before), and had many different ideas on how to go about doing it. I toyed with a few different wreath bases in my head for a while, and the one that I kept going back to and finally decided upon was this ruffled wreath made by Emily Jones of Jones Design Company. I was drawn to its natural feel. I pretty much followed her tutorial, using a 10" styrofoam wreath from a dollar store, and burlap bought by the yard. Then I just spiffed it up!
Here's the end result! I absolutely love it!
I used a few things from my stash, and some wreath adornments found at the local craft store. The pinecones are those ones that smell like cinnamon... yum!
Love how the banner turned out! After I made each pennant, I hot-glued it to the retired silver elastic cord, and hand-sewed it onto the wreath.
I made the pretty little flower below out of the Deck the Halls Designer Series Fabric (SO glad I have two more packages on the way.. I love this stuff!)... I just die-cut some flowers using the retired Flower Layers #3 Big Shot die, folded and layered them, then sewed them together and onto two unfolded layers of flowers. I sewed this as well to the wreath.
And here's how it looks on our door! You'll have to excuse the lighting, as the sun had already set.. :) Maybe I'll try and take another photo in the morning.
I also am thinking about getting a longer wreath holder... as you can see, our peep-hole is a little blocked! You can kind of see through it, but there's a big ol' pinecone there, haha. I'd love to hear what you think about it!
Well, I gotta go.. think I'll make myself some hot chocolate! It has been snowing a little bit off and on, and it's quite cold out. Hope you are staying warm where you are, and thanks for stopping by! :)
I'm linking this here:
Friday, December 3, 2010
The start of my December Daily album
Hi!
I really wanted to start this year with doing a December Daily album, inspired by Ali Edwards. For those of you who don't know, December Daily is an album that documents the days leading up to Christmas, December 25th. Well, some people do the whole month of December, or even just as a "12 Days of Christmas"-type of album, but you get the point. I've been working on getting my album ready.
It took me a while to really get started, for several reasons... one being that I wanted to use a lot of my stash. You may or may not know that my blog contains only projects using 100% Stampin' Up! products (well, whenever possible.. with the exception of things that SU! doesn't sell, like an acrylic picture frame or something). I think I have finally convinced myself that it's ok to let myself even use non-SU! items in my December Daily. Now, that's not to say that I will start posting a bunch of projects with non-SU! items... I'm just allowing myself to do so for my December Daily, since I consider it more of a personal project than most things. If this disappoints you, I hope you understand. :) I anticipate that my album will, however, probably contain at least 90% SU! products.. just because that's mostly what I have and love!
For that reason, and the fact that a lot of the items I might use are retired SU! products, I won't be posting a detailed list of supplies for my December Daily album (but still will of course, for my other projects). If you want to know what I use, though, feel free to shoot me an email!
I also kind of felt that at this stage in our lives, that maybe it wasn't "worth" doing a December Daily.. after all, we don't have children yet. It's something that I tend to struggle with in scrapbooking, too, but I think I am getting better at not feeling that way. But really, this part of our lives is important too, right? Has anyone else ever felt like that at some point?
I've never taken on a project quite like this, but we'll see how this goes, eh? :)
Thanks for reading through that, or at least skimming! Here is part of what I've done so far... mind you, I haven't been printing pictures and adding them yet, and I will be adding more embellishments and journaling to the pages as I add pictures.
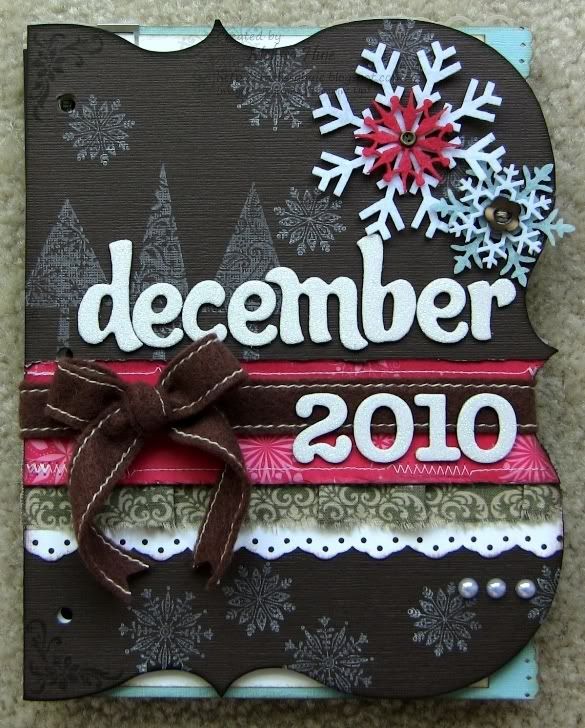
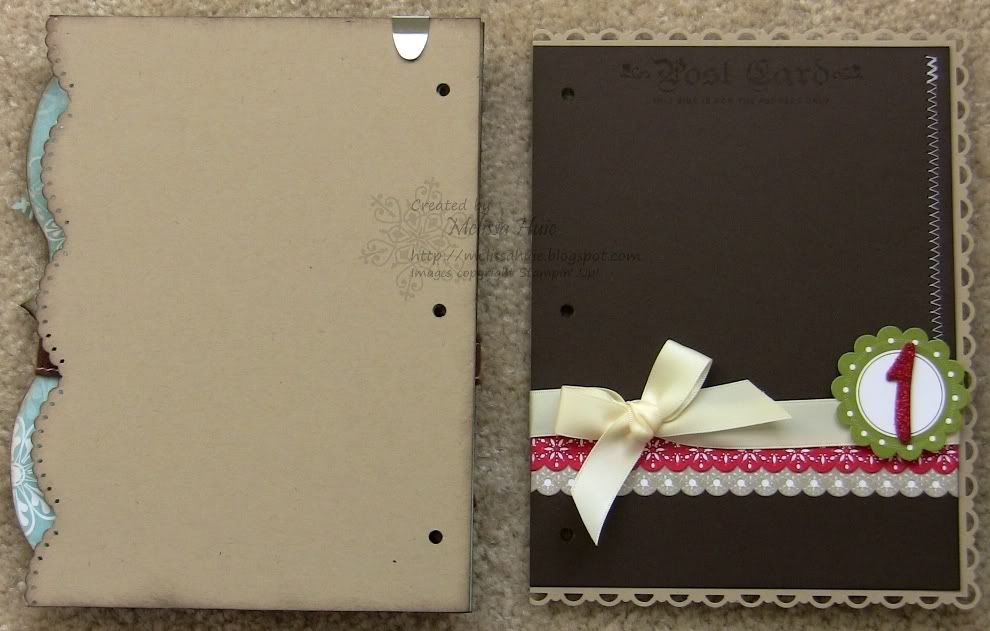
My album is 6" x 8". Here's my cover, which is chipboard, trimmed down from a mini album piece I had in my stash. You can't really see from the photo, but the letters and numbers are glittered.
Here are the next two pages: the inside of the front cover and my title page. I like how Ali created her title page, so I based mine off of hers. She is planning on putting a filmstrip of photos from the month in the blank space. I'm not sure what I'm going to do with the inside of the front cover yet, though.
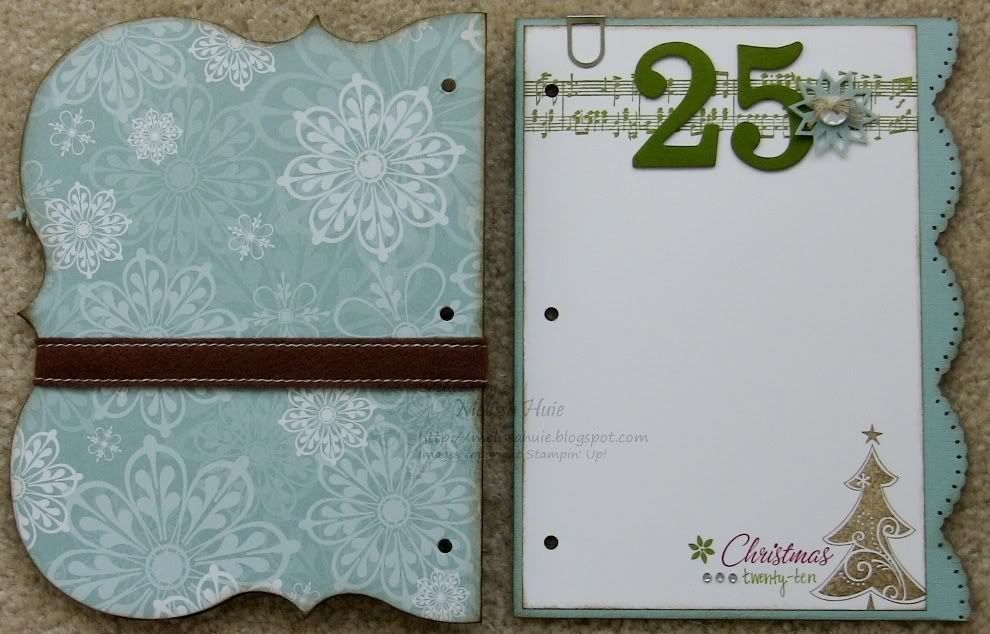
And here's the 2-page spread for Dec. 1st:
Well, thanks for stopping by! I need to get back to work on things on my to-do list. :) Have a great day!
I really wanted to start this year with doing a December Daily album, inspired by Ali Edwards. For those of you who don't know, December Daily is an album that documents the days leading up to Christmas, December 25th. Well, some people do the whole month of December, or even just as a "12 Days of Christmas"-type of album, but you get the point. I've been working on getting my album ready.
It took me a while to really get started, for several reasons... one being that I wanted to use a lot of my stash. You may or may not know that my blog contains only projects using 100% Stampin' Up! products (well, whenever possible.. with the exception of things that SU! doesn't sell, like an acrylic picture frame or something). I think I have finally convinced myself that it's ok to let myself even use non-SU! items in my December Daily. Now, that's not to say that I will start posting a bunch of projects with non-SU! items... I'm just allowing myself to do so for my December Daily, since I consider it more of a personal project than most things. If this disappoints you, I hope you understand. :) I anticipate that my album will, however, probably contain at least 90% SU! products.. just because that's mostly what I have and love!
For that reason, and the fact that a lot of the items I might use are retired SU! products, I won't be posting a detailed list of supplies for my December Daily album (but still will of course, for my other projects). If you want to know what I use, though, feel free to shoot me an email!
I also kind of felt that at this stage in our lives, that maybe it wasn't "worth" doing a December Daily.. after all, we don't have children yet. It's something that I tend to struggle with in scrapbooking, too, but I think I am getting better at not feeling that way. But really, this part of our lives is important too, right? Has anyone else ever felt like that at some point?
I've never taken on a project quite like this, but we'll see how this goes, eh? :)
Thanks for reading through that, or at least skimming! Here is part of what I've done so far... mind you, I haven't been printing pictures and adding them yet, and I will be adding more embellishments and journaling to the pages as I add pictures.
My album is 6" x 8". Here's my cover, which is chipboard, trimmed down from a mini album piece I had in my stash. You can't really see from the photo, but the letters and numbers are glittered.
Here are the next two pages: the inside of the front cover and my title page. I like how Ali created her title page, so I based mine off of hers. She is planning on putting a filmstrip of photos from the month in the blank space. I'm not sure what I'm going to do with the inside of the front cover yet, though.
And here's the 2-page spread for Dec. 1st:
Well, thanks for stopping by! I need to get back to work on things on my to-do list. :) Have a great day!
Tuesday, November 30, 2010
Last chance for the Simply Amazing kit promotion and Online Spectacular sale!

Hello!
Just a quick post to let you know that today is the last day to shop the fabulous deals going on in Stampin' Up!'s Online Spectacular sale, saving you up to 50% on popular products! Click HERE to see all the deals! Remember that online orders of $150 or more get free shipping, in addition to the regular awesome hostess benefits!
Also ending after today is the Simply Amazing kit promotion.. what a perfect gift for you or someone else! Check out the price breakdown HERE!
Feel free to email me at melissahuie@gmail.com if you have any questions. Have a great day!
Wednesday, November 24, 2010
"About a Boy" challenge layout
Hello!
It's been a little while, but I've been busy trying to prepare for the holidays! :) My Dad and my stepmom will be coming down here tomorrow and spending Thanksgiving with us. I'll try to make this a fairly quick post, as I need to get back to getting ready!
I finally finished my layout for the About a Boy challenge over at one of my favorite hangouts, the Memory Makers forum. There's still time to play (needs to be uploaded by the end of today), so you should give it a try! Check the thread out here for details.
So, many of you know that my fiancé Seth and I have been together for quite a while.. it'll be 9 years in February. My, how time flies! I've never actually done a layout like this before, just about him.
The challenge included using a technique from the new PageMaps book by Becky Fleck - creating a faux notebook edge. It took a little time, but I like how it turned out!
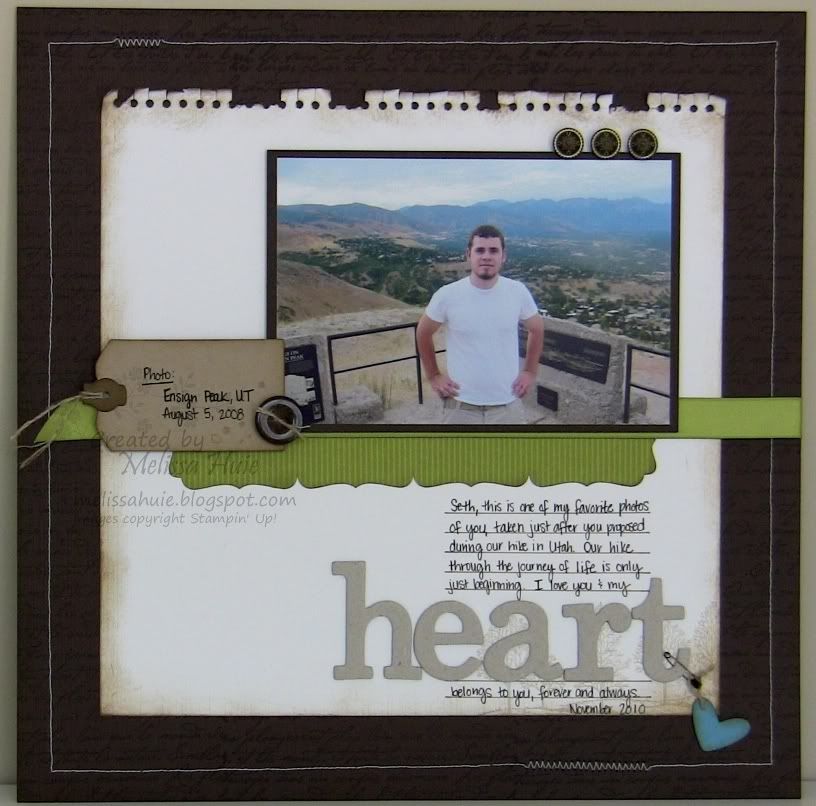
I created my background with the En Français retired background stamp, with VersaMark on Early Espresso textured cardstock, then sewed around the page with my sewing machine and white thread. After creating the notebook edge at the top, I stamped the image from Lovely as a Tree (stamped off on scratch paper first to make it a shade lighter) with Crumb Cake on the textured Whisper White cardstock.
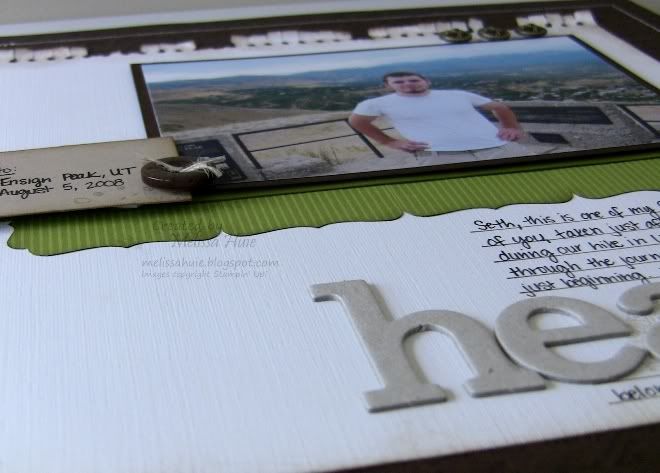
Here's a close-up of the journaling: (it's a little mushy!)

I really love how that little border under the photo looks! It was easy to create using just four punch-outs from the Decorative Label Punch (which is on sale as part of the Handmade Holiday bundles at SU!).. I trimmed the side edges and taped them together on the back.
The tag on the side is from the Table Setting Bigz XL die (which is also on sale!). I punched a hole in it and threaded some Linen Thread through. I did leave my chipboard letters raw, as I felt it added to the overall look of the page. What do you think?
Here are a couple more close-up shots...

Well, I must go.. don't forget to check out the challenge! And don't forget about the items on sale in the Stampin' Up! store. They would all make great gifts! :)
Happy Thanksgiving! I'm grateful that you stopped by my blog!
"heart" layout supplies:
Stamps: Lovely as a Tree, French Foliage, En Français (retired)
Ink: Soft Suede, Crumb Cake, VersaMark
Paper: Early Espresso, Whisper White, Crumb Cake, Marina Mist, and Soft Suede cardstock, Green Tea Designer Series Paper (retired)
Accessories/Tools: Antique Brads, Neutrals Designer Button, Antique Trinkets (safety pin), Timeless Type On Board Chipboard Letters, Old Olive 5/8" Satin Ribbon, Linen Thread, Soft Suede Stampin' Write Marker, Basic Black Stampin' Write Journaler, Stampin' Sponges, Decorative Label and Heart-to-Heart Punches, Crop-a-dile, Table Setting Bigz XL die, sewing machine and thread, Big Shot
It's been a little while, but I've been busy trying to prepare for the holidays! :) My Dad and my stepmom will be coming down here tomorrow and spending Thanksgiving with us. I'll try to make this a fairly quick post, as I need to get back to getting ready!
I finally finished my layout for the About a Boy challenge over at one of my favorite hangouts, the Memory Makers forum. There's still time to play (needs to be uploaded by the end of today), so you should give it a try! Check the thread out here for details.
So, many of you know that my fiancé Seth and I have been together for quite a while.. it'll be 9 years in February. My, how time flies! I've never actually done a layout like this before, just about him.
The challenge included using a technique from the new PageMaps book by Becky Fleck - creating a faux notebook edge. It took a little time, but I like how it turned out!
I created my background with the En Français retired background stamp, with VersaMark on Early Espresso textured cardstock, then sewed around the page with my sewing machine and white thread. After creating the notebook edge at the top, I stamped the image from Lovely as a Tree (stamped off on scratch paper first to make it a shade lighter) with Crumb Cake on the textured Whisper White cardstock.
Here's a close-up of the journaling: (it's a little mushy!)
I really love how that little border under the photo looks! It was easy to create using just four punch-outs from the Decorative Label Punch (which is on sale as part of the Handmade Holiday bundles at SU!).. I trimmed the side edges and taped them together on the back.
The tag on the side is from the Table Setting Bigz XL die (which is also on sale!). I punched a hole in it and threaded some Linen Thread through. I did leave my chipboard letters raw, as I felt it added to the overall look of the page. What do you think?
Here are a couple more close-up shots...
Well, I must go.. don't forget to check out the challenge! And don't forget about the items on sale in the Stampin' Up! store. They would all make great gifts! :)
Happy Thanksgiving! I'm grateful that you stopped by my blog!
"heart" layout supplies:
Stamps: Lovely as a Tree, French Foliage, En Français (retired)
Ink: Soft Suede, Crumb Cake, VersaMark
Paper: Early Espresso, Whisper White, Crumb Cake, Marina Mist, and Soft Suede cardstock, Green Tea Designer Series Paper (retired)
Accessories/Tools: Antique Brads, Neutrals Designer Button, Antique Trinkets (safety pin), Timeless Type On Board Chipboard Letters, Old Olive 5/8" Satin Ribbon, Linen Thread, Soft Suede Stampin' Write Marker, Basic Black Stampin' Write Journaler, Stampin' Sponges, Decorative Label and Heart-to-Heart Punches, Crop-a-dile, Table Setting Bigz XL die, sewing machine and thread, Big Shot
Monday, November 22, 2010
A simply amazing deal!

Through November 30th, you can get the Starter Kit at 50% off.. yes, that's right - get over $300 worth of items for only $87.50, plus free shipping!
Want to know what you're getting in this incredible deal? This awesome breakdown was provided by my demo friend, Lyssa Zwolanek (thanks, Lyssa!):
Here's what is in the CUSTOMIZABLE Standard Kit and the value of each:
1. Any $33.95 or lower Stamp Set
2. Any $28.95 or lower Stamp Set
3. Any $18.95 or lower Stamp Set
4. Any $9.95 or lower Stamp Set
Before we go on, note that the $87.50 kit cost has already paid for the 4 sets above valued at $91.80. That means EVERYTHING BELOW THIS LINE IS FREE!!!!!!
5. $19.95 Brights Patterns Designer Series paper stack (OR color of your choice) FREE
6. $16.95 Stampin’ Scrub® FREE
7. $8.95 Whisper White 5/8" satin ribbon (OR ribbon at the same or lower price) FREE
8. $8.95 VersaMark® pad (OR ink pad at the same or lower price) FREE
9. $8.50 Card stock 8-1/2" x 11" (Whisper White OR color of your choice) FREE
10. $7.95 Small Chocolate Songbird Tile Décor Elements® (OR Décor Elements item at the same or lower price) FREE
11. $6.95 Assorted color card stock 8-1/2" x 11" (Getting Started OR assortment of your choice) FREE
12. $6.95 Clear Block C (OR clear block at the same or lower price) FREE
13. $6.95 SNAIL Adhesive® (OR adhesive at the same or lower price) FREE
14. $6.50 Fast Flowers Stampin’ Around® wheel (OR standard wheel of your choice) FREE
15. $5.95 Stampin’ Around Self Inking Handle (standard) FREE
16. $5.95 Classic Stampin’ Pad® (color of your choice) FREE
17. $5.95 Classic Stampin’ Pad® (color of your choice) FREE
18. $5.95 Classic Stampin’ Pad® (color of your choice) FREE
19. $5.95 Classic Stampin’ Pad® (color of your choice) FREE
20. $5.25 Uninked Cartridge (standard) FREE
21. $4.50 Stampin’ Mist® (OR StazOn® Cleaner) FREE
22. $3.95 Stampin’ Dimensionals® FREE
23. $3.50 Stampin’ Write® marker (color of your choice) FREE
24. $3.50 Stampin’ Write® marker (color of your choice) FREE
25. $3.32 Blender pen (single) FREE
26. $2.95 Marina Mist Classic Ink Refill (OR color of your choice) FREE
27. $1.95 Décor Elements Applicator Tool FREE
28. $1.17 Stamping sponge (single) FREE
29. Catalogs ($29.95 for 8), business forms, and other printed materials to get your business off to a great start! FREE
And were you thinking about getting My Digital Studio, maybe for Christmas? Here’s what is in the CUSTOMIZABLE Digital + Kit and the value of each:
1. $79.95 My Digital Studio™ software* (see description of this product below)
2. $8.50 Card stock 8-1/2" x 11" (Whisper White OR color of your choice)
Before we go on, note that the $87.50 kit cost has paid for the My Digital Studio software & card stock above. That means EVERYTHING BELOW THIS LINE IS FREE!!!!!!
3. Any $26.95 or lower Stamp Set FREE
4. Any $18.95 or lower Stamp Set FREE
5. Any $7.95 or lower Stamp Set FREE
6. $16.95 Stampin’ Scrub® FREE
7. $8.95 Brights Designer buttons FREE
8. $7.95 Small Chocolate Songbird Tile Décor Elements® (OR Décor Elements item at the same or lower price) FREE
9. $6.95 Clear Block C (OR clear block at the same or lower price) FREE
10. $6.95 Assorted color card stock 8-1/2" x 11" (Getting Started OR assortment of your choice) FREE
11. $6.95 SNAIL Adhesive® (OR adhesive at the same or lower price FREE
12. $5.95 Classic Stampin’ Pad® (color of your choice) FREE
13. $5.95 Classic Stampin’ Pad® (color of your choice) FREE
14. $5.95 Classic Stampin’ Pad® (color of your choice) FREE
15. $5.95 Classic Stampin’ Pad® (color of your choice) FREE
16. $4.95 Real Red 1/4" grosgrain ribbon (OR ribbon at the same or lower price) FREE
17. $4.95 Glue Dots® FREE
18. $4.50 Stampin’ Mist® (OR StazOn® Cleaner) FREE
19. $3.95 Stampin’ Dimensionals® FREE
20. $3.50 Stampin’ Write® marker (color of your choice) FREE
21. $3.50 Stampin’ Write® marker (color of your choice) FREE
22. $1.95 Décor Elements Applicator Tool FREE
23. Catalogs ($29.95 for 8), business forms, and other printed materials to get your business off to a great start! FREE
Seen enough? Email me today at melissahuie@gmail.com and I'll get you hooked up and answer any questions you have about being a hobby or business demo, our low quarterly minimums, and what happens if you don't decide to stick with it. Or, if you're already convinced, just go to http://melissahuie.stampinup.net and click on Join Now. My authorization password is "fluffy3" and the whole process will only take you about twenty minutes total if you already know what you want in your kit!
A spectacular sale!

Don't you just love a sale? I definitely do!!
For 9 days only (through November 30th), save up to 50% on your favorite products! And, online orders through my website of $150 merchandise or more get free shipping!
There is truly something for everyone, even the digi-scrappers! :)
Check out this PDF here for a list of all the discounted products and prices, then RUN over to my website! :) Get your Christmas shopping done early, or pick up a few goodies for yourself with these fabulous deals!
Feel free to contact me if you have any questions! Have a great day!
Thursday, November 11, 2010
Winter Post Greetings
Hello!
One of my all-time favorite stamp sets has been Winter Post. It seems that I've been on a vintage kick lately, but I think it really started when Winter Post was released. :)
I used Mojo Monday's sketch this week to create my card..
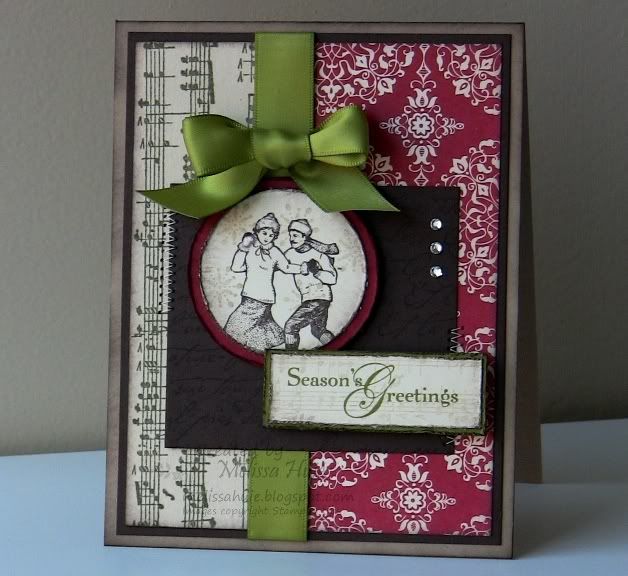
Yes, yes.. the Music Notes wheel again.. which, by the way, makes two appearances on this card. :) I love it! The Very Vanilla cardstock on the left was stamped twice with the Music Notes wheel and Always Artichoke ink, then adhered to the right of the Love Letter Designer Series Paper. The center Early Espresso piece was stamped with the retired French Script background stamp, then sewn onto the card front. To get the really light impression on the sentiment piece, I inked up the wheel with my Crumb Cake ink pad, then rolled it on scratch paper before going over the Very Vanilla cardstock.
I stamped the ice skaters over some snowflakes (which were stamped with the same technique as above to get a lighter shade of ink) on a 1-3/4" circle, which was then layered on a 2" circle die-cut with the Circles #2 die. Notice the little hint of shimmer on the female skater? I filled in her hat and gloves with a little Illuminate Top Coat Smooch Pearlized Accent Ink. It's so pretty and has such a subtle shimmer!
Of course, to finish off the card, I needed to also add some of my favorite embellishments, the Basic Rhinestone Jewels. :)
Thanks for stopping by, and I hope you have a great day!
Winter Post Greetings card supplies:
Stamps: Winter Post, Snow Swirled, French Script (retired)
Ink: Crumb Cake, Early Espresso, Old Olive, and Always Artichoke
Paper: Very Vanilla, Crumb Cake, Early Espresso, Riding Hood Red, and Old Olive cardstock, Love Letter Designer Series Paper
Accessories/Tools: Music Notes Wheel, Basic Rhinestone Jewels, Old Olive Satin Ribbon, 1-3/4" Circle Punch, Circles #2 Originals die, Big Shot, sewing machine and thread
One of my all-time favorite stamp sets has been Winter Post. It seems that I've been on a vintage kick lately, but I think it really started when Winter Post was released. :)
I used Mojo Monday's sketch this week to create my card..
Yes, yes.. the Music Notes wheel again.. which, by the way, makes two appearances on this card. :) I love it! The Very Vanilla cardstock on the left was stamped twice with the Music Notes wheel and Always Artichoke ink, then adhered to the right of the Love Letter Designer Series Paper. The center Early Espresso piece was stamped with the retired French Script background stamp, then sewn onto the card front. To get the really light impression on the sentiment piece, I inked up the wheel with my Crumb Cake ink pad, then rolled it on scratch paper before going over the Very Vanilla cardstock.
I stamped the ice skaters over some snowflakes (which were stamped with the same technique as above to get a lighter shade of ink) on a 1-3/4" circle, which was then layered on a 2" circle die-cut with the Circles #2 die. Notice the little hint of shimmer on the female skater? I filled in her hat and gloves with a little Illuminate Top Coat Smooch Pearlized Accent Ink. It's so pretty and has such a subtle shimmer!
Of course, to finish off the card, I needed to also add some of my favorite embellishments, the Basic Rhinestone Jewels. :)
Thanks for stopping by, and I hope you have a great day!
Winter Post Greetings card supplies:
Stamps: Winter Post, Snow Swirled, French Script (retired)
Ink: Crumb Cake, Early Espresso, Old Olive, and Always Artichoke
Paper: Very Vanilla, Crumb Cake, Early Espresso, Riding Hood Red, and Old Olive cardstock, Love Letter Designer Series Paper
Accessories/Tools: Music Notes Wheel, Basic Rhinestone Jewels, Old Olive Satin Ribbon, 1-3/4" Circle Punch, Circles #2 Originals die, Big Shot, sewing machine and thread
Tuesday, November 9, 2010
My inspiration board!
Hello!
I've had this pretty bulletin board for a while, having wanted to create an "inspiration board" of sorts and finding the board at a craft store on clearance. I wanted to incorporate Stampin' Up!'s decorative line in somehow, originally planning on using a stencil. I couldn't decide what stencil to use, though. ;)
I adore the Upsy Daisy DE, and realized it would look perfect on the board. I simply cut it down to create the look I wanted before applying. It literally took me a couple of minutes to prepare and apply it to the bulletin board! (Just to let you know, the daisies aren't as blinding white in real life as they are in the pictures. LOL - I really think the pictures don't do this much justice!)
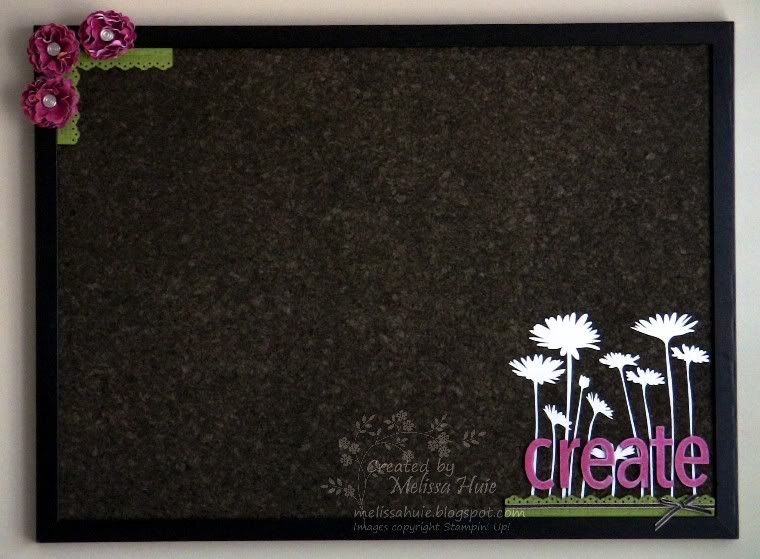
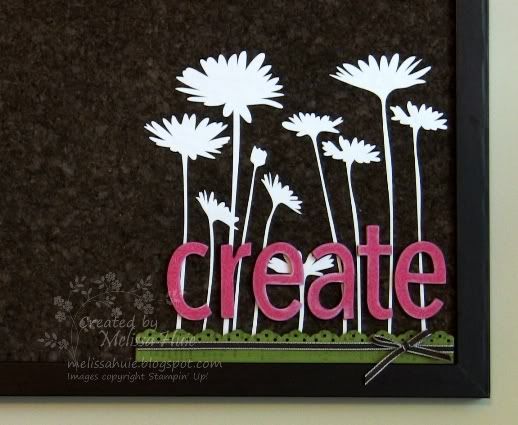
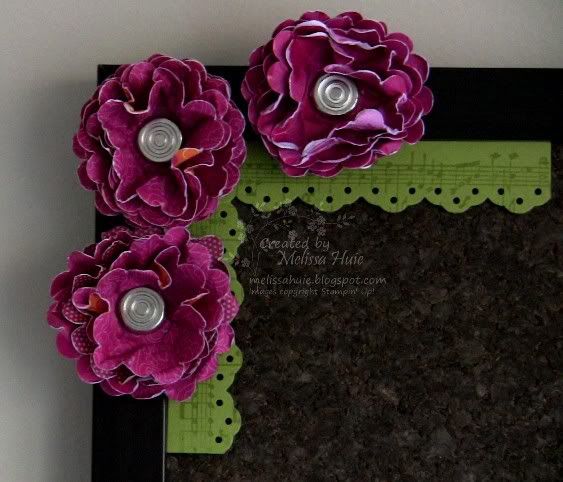
Next, I cut out the letters to spell "create" out of chipboard and using the Simple Letters Bigz dies. I then cut the letters out of Sweet & Sour Specialty Designer Series Paper and adhered it to the chipboard using the Anywhere Glue Stick (love this for covering chipboard). I inked the letters with Whisper White Craft ink, then added them to the board with Stampin' Dimensionals. Of course, I also had to use my Music Notes wheel on my Old Olive punched borders. :) The group of scrunched flowers was the finishing touch!
Here are some close-up shots of the two corners:
Of course, the board is "naked" at the moment... I'm going to work on making some altered push pins and clothespins and start hanging things received from friends and inspirational photos, etc. I also might add some other things to the actual design of the board, but you get the idea. :)
Thanks for stopping by!
Inspiration bulletin board supplies:
Stamps: Music Notes wheel
Ink: VersaMark ink, Whisper White Craft Stampin' Pad
Paper: Old Olive cardstock, Sweet & Sour Specialty Designer Series Paper, Thoroughly Modern DSP (retired)
Accessories/Tools: Upsy Daisy White Décor Elements vinyl, On Board Long Board chipboard, Simple Letters Bigz dies, Eyelet Border and 1-3/8" Scallop Circle Punches, Early Espresso 1/8" Taffeta Ribbon, Circle Designer Brads (retired), Big Shot
I've had this pretty bulletin board for a while, having wanted to create an "inspiration board" of sorts and finding the board at a craft store on clearance. I wanted to incorporate Stampin' Up!'s decorative line in somehow, originally planning on using a stencil. I couldn't decide what stencil to use, though. ;)
I adore the Upsy Daisy DE, and realized it would look perfect on the board. I simply cut it down to create the look I wanted before applying. It literally took me a couple of minutes to prepare and apply it to the bulletin board! (Just to let you know, the daisies aren't as blinding white in real life as they are in the pictures. LOL - I really think the pictures don't do this much justice!)
Next, I cut out the letters to spell "create" out of chipboard and using the Simple Letters Bigz dies. I then cut the letters out of Sweet & Sour Specialty Designer Series Paper and adhered it to the chipboard using the Anywhere Glue Stick (love this for covering chipboard). I inked the letters with Whisper White Craft ink, then added them to the board with Stampin' Dimensionals. Of course, I also had to use my Music Notes wheel on my Old Olive punched borders. :) The group of scrunched flowers was the finishing touch!
Here are some close-up shots of the two corners:
Of course, the board is "naked" at the moment... I'm going to work on making some altered push pins and clothespins and start hanging things received from friends and inspirational photos, etc. I also might add some other things to the actual design of the board, but you get the idea. :)
Thanks for stopping by!
Inspiration bulletin board supplies:
Stamps: Music Notes wheel
Ink: VersaMark ink, Whisper White Craft Stampin' Pad
Paper: Old Olive cardstock, Sweet & Sour Specialty Designer Series Paper, Thoroughly Modern DSP (retired)
Accessories/Tools: Upsy Daisy White Décor Elements vinyl, On Board Long Board chipboard, Simple Letters Bigz dies, Eyelet Border and 1-3/8" Scallop Circle Punches, Early Espresso 1/8" Taffeta Ribbon, Circle Designer Brads (retired), Big Shot
Friday, November 5, 2010
Vintage Mojo Rosette
Happy Friday!
I naturally gravitate towards autumnal colors, so this week's color combination challenge (using Peach Parfait, Early Espresso and Cajun Craze) at Splitcoaststampers kept jumping out in my mind. I combined it with this week's Mojo Monday sketch to create my card...

This is definitely a card that you couldn't fit in a regular envelope, but that just makes it so much more fun! :)
I created my background by rolling the Very Vintage jumbo wheel across the cardstock several times, using my Wheel Guide to allow me to fill the background nicely. I then stitched two pieces of Chantilly Lace Trim together using a zig-zag stitch, and stitched that to the background.
I then sprayed some Log Cabin Smooch Spritz over the Newsprint Designer Series Paper, using the Mostly Vintage mask to create a pretty pattern on the DSP. Two layers of pleated Waffle Paper make for a pretty treatment at the top, which was then topped off with a piece of Cajun Craze (stamped with the Music Notes wheel) punched with the Eyelet Border Punch. I had scored the Cajun Craze piece and folded it over the top of the panel, then tied a piece of Early Espresso 1/8" Taffeta Ribbon around it.
The butterfly shows off our fun cork, which cuts beautifully in the Big Shot. This butterfly was die-cut using the Beautiful Butterflies Bigz die, then I tied some Linen Thread around to create the body and antenna. I added some Basic Rhinestone Jewels to the body as well.
I just love the way the rosette turned out! It's a spiral piece die-cut with the Table Setting Bigz XL die, which I rolled into the rosette shape, starting at one end of the spiral. The die-cut actually creates a bigger rosette, but I trimmed it a little to make it small enough for my card. I spritzed the rosette with Log Cabin Smooch Spritz as well, then bent the petals down a little. I then sponged it with Early Espresso ink before adding the three Basic Rhinestone Jewels.
Ok, the last part of the card is the sentiment tag, which I created by layering the Decorative Label punch-out and a die-cut from the Lots of Tags Sizzlits die set. Don't you think they layer perfectly?
Well, hope I explained it all well enough. :) Thanks for stopping by, and I hope you have a wonderful weekend!
Vintage Rosette card supplies:
Stamps: Occasional Quotes
Ink: Early Espresso Classic Stampin' Pad, VersaMark ink
Paper: Early Espresso, Cajun Craze, Peach Parfait, Crumb Cake, and Very Vanilla cardstock, Newsprint Designer Series Paper
Accessories/Tools: Basic Rhinestone Jewels, Chantilly Lace Trim, Early Espresso 1/8" Taffeta Ribbon, Linen Thread, Cork Sheet, Early Espresso Waffle Paper, Mostly Vintage mask, Music Notes Wheel, Very Vintage Jumbo Wheel, Eyelet Border and Decorative Label Punches, Lots of Tags Sizzlits die set, Table Setting Bigz XL die, Beautiful Butterflies Bigz die, Stampin' Sponges, Big Shot, sewing machine and vanilla thread
I naturally gravitate towards autumnal colors, so this week's color combination challenge (using Peach Parfait, Early Espresso and Cajun Craze) at Splitcoaststampers kept jumping out in my mind. I combined it with this week's Mojo Monday sketch to create my card...
This is definitely a card that you couldn't fit in a regular envelope, but that just makes it so much more fun! :)
I created my background by rolling the Very Vintage jumbo wheel across the cardstock several times, using my Wheel Guide to allow me to fill the background nicely. I then stitched two pieces of Chantilly Lace Trim together using a zig-zag stitch, and stitched that to the background.
I then sprayed some Log Cabin Smooch Spritz over the Newsprint Designer Series Paper, using the Mostly Vintage mask to create a pretty pattern on the DSP. Two layers of pleated Waffle Paper make for a pretty treatment at the top, which was then topped off with a piece of Cajun Craze (stamped with the Music Notes wheel) punched with the Eyelet Border Punch. I had scored the Cajun Craze piece and folded it over the top of the panel, then tied a piece of Early Espresso 1/8" Taffeta Ribbon around it.
The butterfly shows off our fun cork, which cuts beautifully in the Big Shot. This butterfly was die-cut using the Beautiful Butterflies Bigz die, then I tied some Linen Thread around to create the body and antenna. I added some Basic Rhinestone Jewels to the body as well.
I just love the way the rosette turned out! It's a spiral piece die-cut with the Table Setting Bigz XL die, which I rolled into the rosette shape, starting at one end of the spiral. The die-cut actually creates a bigger rosette, but I trimmed it a little to make it small enough for my card. I spritzed the rosette with Log Cabin Smooch Spritz as well, then bent the petals down a little. I then sponged it with Early Espresso ink before adding the three Basic Rhinestone Jewels.
Ok, the last part of the card is the sentiment tag, which I created by layering the Decorative Label punch-out and a die-cut from the Lots of Tags Sizzlits die set. Don't you think they layer perfectly?
Well, hope I explained it all well enough. :) Thanks for stopping by, and I hope you have a wonderful weekend!
Vintage Rosette card supplies:
Stamps: Occasional Quotes
Ink: Early Espresso Classic Stampin' Pad, VersaMark ink
Paper: Early Espresso, Cajun Craze, Peach Parfait, Crumb Cake, and Very Vanilla cardstock, Newsprint Designer Series Paper
Accessories/Tools: Basic Rhinestone Jewels, Chantilly Lace Trim, Early Espresso 1/8" Taffeta Ribbon, Linen Thread, Cork Sheet, Early Espresso Waffle Paper, Mostly Vintage mask, Music Notes Wheel, Very Vintage Jumbo Wheel, Eyelet Border and Decorative Label Punches, Lots of Tags Sizzlits die set, Table Setting Bigz XL die, Beautiful Butterflies Bigz die, Stampin' Sponges, Big Shot, sewing machine and vanilla thread
Thursday, November 4, 2010
Winner of November's Paper Crafters Sampler!
Congratulations to the winner of November's issue of Paper Crafters Sampler... Jenn!
Jenn - I'll be contacting Melanie with your email address. Enjoy your free issue! :)
If you didn't win, don't despair! You can still subscribe to this wonderful resource by clicking here and noting the code PCSMH!
Jenn - I'll be contacting Melanie with your email address. Enjoy your free issue! :)
If you didn't win, don't despair! You can still subscribe to this wonderful resource by clicking here and noting the code PCSMH!
Wednesday, November 3, 2010
Paper Crafters Sampler November Giveaway!
Hi!
So as some of you might know, I'm on the design team for Paper Crafters Sampler. If you haven't heard about it, Paper Crafters Sampler is an online crafting resource that helps you get the most out of your Stampin' Up! products, and where you will find 8-10 wonderful projects each month.
This month, each of us is giving away a free issue! Simply leave a comment on this post telling me about a favorite family tradition. Please leave a comment before midnight today to qualify, and it's open to everyone. Yay! :)

Here's a sneak peek of my project in this month's issue, which will be released on November 10th:

Remember, if you subscribe to Paper Crafters Sampler, be sure to note my referral code, which is PCSMH.
Have a fabulous day!
So as some of you might know, I'm on the design team for Paper Crafters Sampler. If you haven't heard about it, Paper Crafters Sampler is an online crafting resource that helps you get the most out of your Stampin' Up! products, and where you will find 8-10 wonderful projects each month.
This month, each of us is giving away a free issue! Simply leave a comment on this post telling me about a favorite family tradition. Please leave a comment before midnight today to qualify, and it's open to everyone. Yay! :)
Have a fabulous day!
Tuesday, November 2, 2010
An elegant wedding card
Hi!
One of my favorite new sentiment stamp sets is Occasional Quotes, which is a Level 3 Hostess set. You can earn it for free with a qualifying workshop... or, if you were a demonstrator, you could have pre-ordered it in June (LOVE that perk)! Just keep that last part in mind, because think of what kinds of goodies SU! will have next catalog, and you could always join my team... :)
Anyway, so back to the sentiments! This one goes very well with the images from the Artistic Etchings stamp set...
Let me tell you how much I adore that Music Notes wheel.. I'm sure you're tired of hearing about that! If you don't have it... well, why not?? It makes the perfect background, as you can see here. And if you use stamp wheels, you'll definitely want to use them with the Stampin' Around Wheel Guide, which will make your wheeling life so much easier. :)
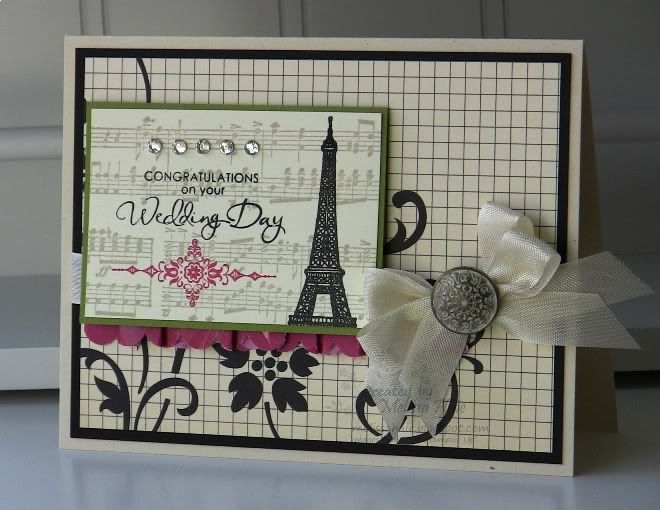
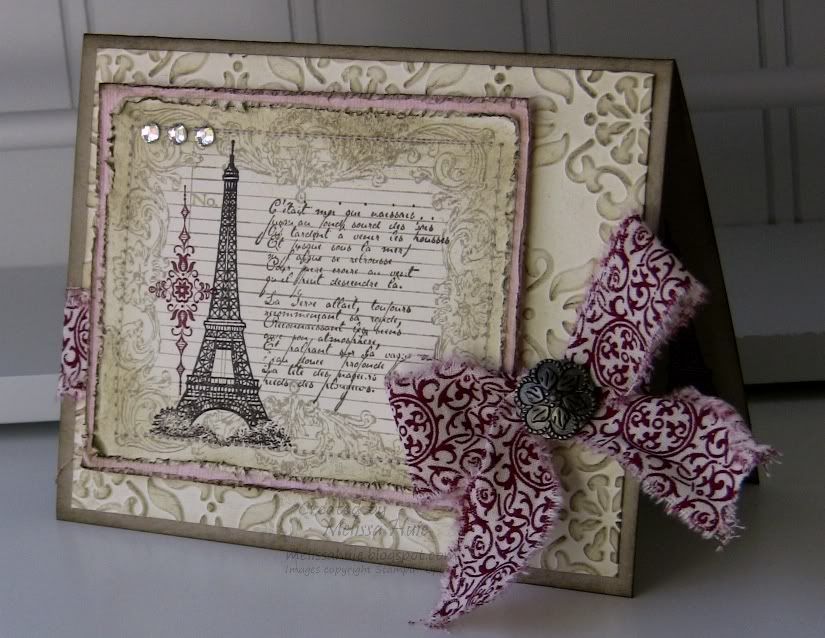
I stamped the Eiffel Tower with VersaMark, then heat embossed with Black Stampin' Emboss powder, then stamped the rest as you can see above. The bow is a little different than usual - I've seen around here and there little doubled bows, and wanted to try it out, too. I created mine here by tying a bow in the Very Vanilla Seam Binding, then taking another piece and tying another bow around that one, then finished it off with an Antique Brad. Pretty, eh? And perfect for a wedding card.
My ruffle was created by punching a strip of Sweet & Sour Specialty Designer Series Paper (it has beautiful glossy accents) with the Scallop Edge punch, then folding it here and there to create random ruffles before adhering it to the card. The rhinestones create the perfect finish there at the top!
Thanks for stopping by! I have something special planned for tomorrow, so be sure to come back and see! :)
Wedding card supplies:
Stamps: Occasional Quotes, Artistic Etchings
Ink: Jet Black StazOn, Rose Red Classic Stampin' Pad, VersaMark ink
Paper: Basic Black, Naturals Ivory, Very Vanilla, and Old Olive cardstock, Love Letter Designer Series Paper, Sweet & Sour Specialty Designer Series paper
Accessories/Tools: Music Notes Wheel, Very Vanilla Seam Binding, Antique Brad, Basic Rhinestone Jewels, Black Stampin' Emboss Powder, Heat Tool, Stampin' Around Wheel Guide, Scallop Edge Punch
One of my favorite new sentiment stamp sets is Occasional Quotes, which is a Level 3 Hostess set. You can earn it for free with a qualifying workshop... or, if you were a demonstrator, you could have pre-ordered it in June (LOVE that perk)! Just keep that last part in mind, because think of what kinds of goodies SU! will have next catalog, and you could always join my team... :)
Anyway, so back to the sentiments! This one goes very well with the images from the Artistic Etchings stamp set...
Let me tell you how much I adore that Music Notes wheel.. I'm sure you're tired of hearing about that! If you don't have it... well, why not?? It makes the perfect background, as you can see here. And if you use stamp wheels, you'll definitely want to use them with the Stampin' Around Wheel Guide, which will make your wheeling life so much easier. :)
I stamped the Eiffel Tower with VersaMark, then heat embossed with Black Stampin' Emboss powder, then stamped the rest as you can see above. The bow is a little different than usual - I've seen around here and there little doubled bows, and wanted to try it out, too. I created mine here by tying a bow in the Very Vanilla Seam Binding, then taking another piece and tying another bow around that one, then finished it off with an Antique Brad. Pretty, eh? And perfect for a wedding card.
My ruffle was created by punching a strip of Sweet & Sour Specialty Designer Series Paper (it has beautiful glossy accents) with the Scallop Edge punch, then folding it here and there to create random ruffles before adhering it to the card. The rhinestones create the perfect finish there at the top!
Thanks for stopping by! I have something special planned for tomorrow, so be sure to come back and see! :)
Wedding card supplies:
Stamps: Occasional Quotes, Artistic Etchings
Ink: Jet Black StazOn, Rose Red Classic Stampin' Pad, VersaMark ink
Paper: Basic Black, Naturals Ivory, Very Vanilla, and Old Olive cardstock, Love Letter Designer Series Paper, Sweet & Sour Specialty Designer Series paper
Accessories/Tools: Music Notes Wheel, Very Vanilla Seam Binding, Antique Brad, Basic Rhinestone Jewels, Black Stampin' Emboss Powder, Heat Tool, Stampin' Around Wheel Guide, Scallop Edge Punch
Monday, November 1, 2010
Giveaway winner!
Hello!
Thanks everyone for visiting me over the weekend and leaving comments! :)
Random.org says the winner is...
 ...Serene! Congrats, Serene!
Did you all know that November is National Blog Posting Month? Well, I've decided to challenge myself to post on my blog every weekday (Monday-Friday) this month. Just a fun challenge to get myself blogging more! :)
I'll be back later! Thanks for stopping by!
Thanks everyone for visiting me over the weekend and leaving comments! :)
Random.org says the winner is...
Did you all know that November is National Blog Posting Month? Well, I've decided to challenge myself to post on my blog every weekday (Monday-Friday) this month. Just a fun challenge to get myself blogging more! :)
I'll be back later! Thanks for stopping by!
Friday, October 29, 2010
Simple one-layer card and a giveaway!
Happy Friday! Thank you for all the comments on the embellished tee I posted yesterday. I always cherish your comments!
This month marks my first blog-iversary! Yay!
To celebrate, let's have awesome giveaway! You'll have to read on to find out, though, what it is... :) First, I have a simple, one-layer card to show you:
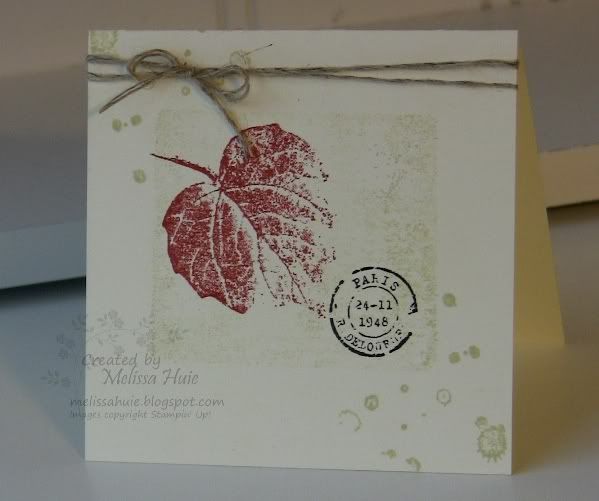
See what an impact even one piece of cardstock can make? All I did was take a piece of Very Vanilla cardstock, and folded it to make a 3" x 3" card. I then inked up a clear block with River Rock Classic ink, then stamped off on scratch paper before stamping on my cardstock. Then I just stamped various images from the French Foliage stamp set, and tied a piece of Linen Thread around the top. Very easy to do, and you could definitely increase the size of the card to make a standard-sized 4-1/4" x 5-1/2" card.
Simple Fall card supplies:
Stamps: French Foliage
Ink: River Rock, Cajun Craze, Early Espresso
Paper: Very Vanilla cardstock
Accessories/Tools: Linen Thread
Ok, I made you wait long enough! :)
Drumroll, please...
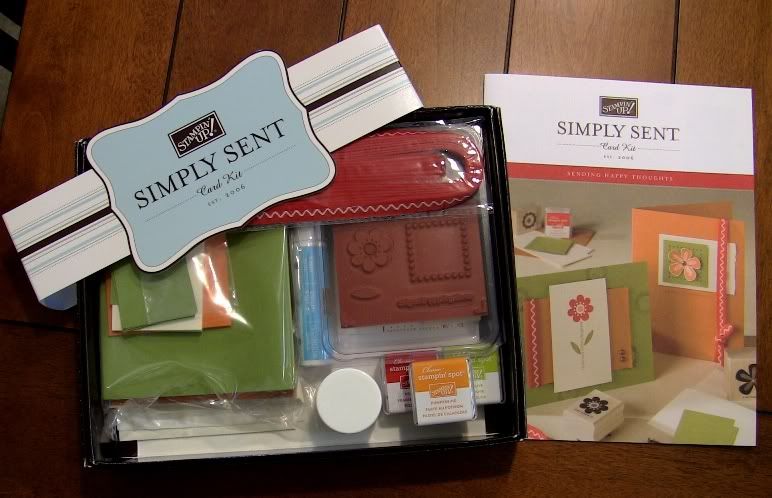
Here's something that is fabulous for if you want to get into making cards, and you don't know where to start. This kit has everything you need to make 10 cards, 5 of each style you see on the front of the instruction booklet there. You could also just go your own way of course, and just use the materials on whatever you'd like! There are no rules in creativity!
Included in the kit:
Sending Happy Thoughts stamp set (set of 6)
Old Olive Classic Stampin' Spot
Pumpkin Pie Classic Stampin’ Spot
Real Red Classic Stampin’ Spot
Zig Zag Twill Tape
Pewter Brads
2-Way Glue Pen
Dazzling Diamonds Stampin’ Glitter
Stampin’ Dimensionals
Mini Glue Dots®
Card Stock Assortment
12 Very Vanilla Envelopes
There are rules, however, in the giveaway. ;) Please leave a comment telling me what fun plans you have this weekend (even if it's just relaxing!) before 11:59 PM EST Sunday, October 31st, and I will pick a random winner on Monday morning. Unfortunately, I can only do this in the U.S... sorry! Be sure to check back, because the winner will have to email me to claim their prize! :)
Good luck!! And thanks for stopping by!
This month marks my first blog-iversary! Yay!
To celebrate, let's have awesome giveaway! You'll have to read on to find out, though, what it is... :) First, I have a simple, one-layer card to show you:
See what an impact even one piece of cardstock can make? All I did was take a piece of Very Vanilla cardstock, and folded it to make a 3" x 3" card. I then inked up a clear block with River Rock Classic ink, then stamped off on scratch paper before stamping on my cardstock. Then I just stamped various images from the French Foliage stamp set, and tied a piece of Linen Thread around the top. Very easy to do, and you could definitely increase the size of the card to make a standard-sized 4-1/4" x 5-1/2" card.
Simple Fall card supplies:
Stamps: French Foliage
Ink: River Rock, Cajun Craze, Early Espresso
Paper: Very Vanilla cardstock
Accessories/Tools: Linen Thread
Ok, I made you wait long enough! :)
Drumroll, please...
Here's something that is fabulous for if you want to get into making cards, and you don't know where to start. This kit has everything you need to make 10 cards, 5 of each style you see on the front of the instruction booklet there. You could also just go your own way of course, and just use the materials on whatever you'd like! There are no rules in creativity!
Included in the kit:
Sending Happy Thoughts stamp set (set of 6)
Old Olive Classic Stampin' Spot
Pumpkin Pie Classic Stampin’ Spot
Real Red Classic Stampin’ Spot
Zig Zag Twill Tape
Pewter Brads
2-Way Glue Pen
Dazzling Diamonds Stampin’ Glitter
Stampin’ Dimensionals
Mini Glue Dots®
Card Stock Assortment
12 Very Vanilla Envelopes
There are rules, however, in the giveaway. ;) Please leave a comment telling me what fun plans you have this weekend (even if it's just relaxing!) before 11:59 PM EST Sunday, October 31st, and I will pick a random winner on Monday morning. Unfortunately, I can only do this in the U.S... sorry! Be sure to check back, because the winner will have to email me to claim their prize! :)
Good luck!! And thanks for stopping by!
Thursday, October 28, 2010
Embellished tee
Hello, hello!
Today I decided to be brave and cut into a shirt of mine. :)
I've been wanting to try embellishing a tee for quite some time, and I was SO excited to snag some Sizzix flower dies from the Stampin' Up! Clearance Rack. (You got yours, didn't you??) I was inspired by Elizabeth Kartchner's tee here.
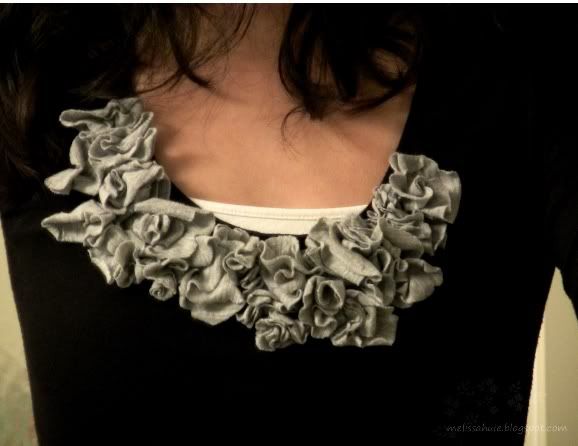
Well, I've had this black tee for a while, and I felt it was time to spruce it up. I took a deep breath, and cut up a light gray knit shirt I had gotten on clearance a while back, then ran the fabric through my Big Shot several times (I used about half of the gray shirt) with the Flower Layers die. After cutting all of my pieces, I hand-sewed them onto my shirt. I actually washed my shirt too, after sewing, to see how it would look day-to-day.
Here is is...

I am quite proud of it, and I'm sure Seth knows it since I was pretty much happy-dancing around with it on. Haha!
Here's a closer view of the neckline:
LOVE IT!! ♥ :D
As you can see, I had sewn quite a few flowers on there, using the different sizes cut out with the die. Periodically as I was sewing, it helped to hold the shirt up and see how the flowers would hang. I also tried it on when I was almost done, to see if there were any gaps.
This was so fun, and it didn't even take me 2 hours from start to finish! I snagged a couple of other flower dies, and can't wait to embellish some more clothes! (If you have the Flower Folds Bigz XL die, that would work perfectly too.. I just don't have that one yet. :) )
Well, thanks for stopping by! Let me know if you find any good sales on some solid-color knit shirts! ;)
Today I decided to be brave and cut into a shirt of mine. :)
I've been wanting to try embellishing a tee for quite some time, and I was SO excited to snag some Sizzix flower dies from the Stampin' Up! Clearance Rack. (You got yours, didn't you??) I was inspired by Elizabeth Kartchner's tee here.
Well, I've had this black tee for a while, and I felt it was time to spruce it up. I took a deep breath, and cut up a light gray knit shirt I had gotten on clearance a while back, then ran the fabric through my Big Shot several times (I used about half of the gray shirt) with the Flower Layers die. After cutting all of my pieces, I hand-sewed them onto my shirt. I actually washed my shirt too, after sewing, to see how it would look day-to-day.
Here is is...
I am quite proud of it, and I'm sure Seth knows it since I was pretty much happy-dancing around with it on. Haha!
Here's a closer view of the neckline:
LOVE IT!! ♥ :D
As you can see, I had sewn quite a few flowers on there, using the different sizes cut out with the die. Periodically as I was sewing, it helped to hold the shirt up and see how the flowers would hang. I also tried it on when I was almost done, to see if there were any gaps.
This was so fun, and it didn't even take me 2 hours from start to finish! I snagged a couple of other flower dies, and can't wait to embellish some more clothes! (If you have the Flower Folds Bigz XL die, that would work perfectly too.. I just don't have that one yet. :) )
Well, thanks for stopping by! Let me know if you find any good sales on some solid-color knit shirts! ;)
Friday, October 22, 2010
Sweet and Shabby Fabric card
Happy Friday!
I tried something new this week - ripping fabric! I tore a strip of our gorgeous Deck the Halls Designer Fabric... and I have to say, it felt almost liberating! LOL
Here's my card...
Wow! I love the impact of the big, shabby bow, don't you? And it was so easy to create! The strip was torn lengthwise along the fabric, and is approximately 1" wide. I folded my length of fabric in half, and actually snipped about 1" into both layers of the fabric ends, then held the layers together as I tore the strip. Hope that makes sense! I feel that helped me in trying to keep the width even throughout the strip. Then I just tied a nice, big bow and attached an Antique Brad to the center. I folded the ends of the bow in half and snipped at an angle to create a "V" shape, then roughed up the edges a little by pulling some fibers from the fabric.
I did a little bit of collage stamping for my focal piece, and stitched around the perimeter. (You can tell which stamp sets are my current favorites, right? Just checking!) And of course, I felt that the rhinestones added the perfect touch of bling! The embossing in the background stands out nicely with the help of Soft Suede ink sponged over it.
So there's another project created using the fabric for something other than Christmas! I tell you, I'm going to have to buy a few more packages of it... I'm scared to run out; it's so beautiful and versatile!
On another note... I have to share that I am the lucky winner of Donna's Funky Junk giveaway! YAY! I can't wait to put the items to use! Thank you again to Donna!
And thanks for stopping by! Hope you have a fabulous weekend!
Sweet and Shabby Fabric card supplies:
Stamps: French Foliage, Notably Ornate, Artistic Etchings
Ink: Crumb Cake, Cherry Cobbler, Early Espresso, and Soft Suede Classic ink
Paper: Crumb Cake, Very Vanilla and Pink Pirouette cardstock
Accessories/Tools: Deck the Halls Designer Fabric, Antique Brad, Rhinestone Basic Jewels, Cutter Kit, Stampin' Sponge, Vintage Wallpaper Textured Impressions Folder, Big Shot, sewing machine and thread
Friday, October 15, 2010
Mini Notebook Cover with Designer Fabric
Happy Friday!!
I started this project a few weeks ago, and then put it aside for a while. I finished it today!
I thought it would be cute to use Stampin' Up!'s beautiful new Designer Fabric to create a cover for a notebook. Well, I had some mini composition notebooks laying around that I found on clearance last year, so I created this...

I love how it turned out! I actually used the Deck the Halls Designer Fabric from the Holiday Mini Catalog... so as you can see, the fabric is more than just for the holidays! The mini notebook slides into the cover (like those old textbook covers you used to make out of paper bags for school), so it's replaceable when you fill up the notebook.
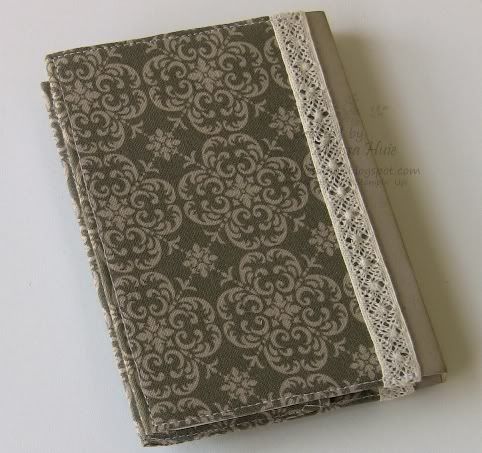
To start out, I measured and cut a piece of Crumb Cake cardstock to make a "folder". This just covers the outside of the notebook, leaving excess space around the edges to allow for the sewing. I attached some of the fabric to the front of the Crumb Cake cardstock using the Anywhere Glue Stick, then created a pocket on the inside to hold the notebook. I attached the Chantilly Crochet Trim, then sewed around the edges with my sewing machine (you can see a little blooper there on the bottom edge where my needle kind of skipped a little... oops! Hey, adds to the homemade look, right?). The edges of the fabric on the inside are finished, not left raw.
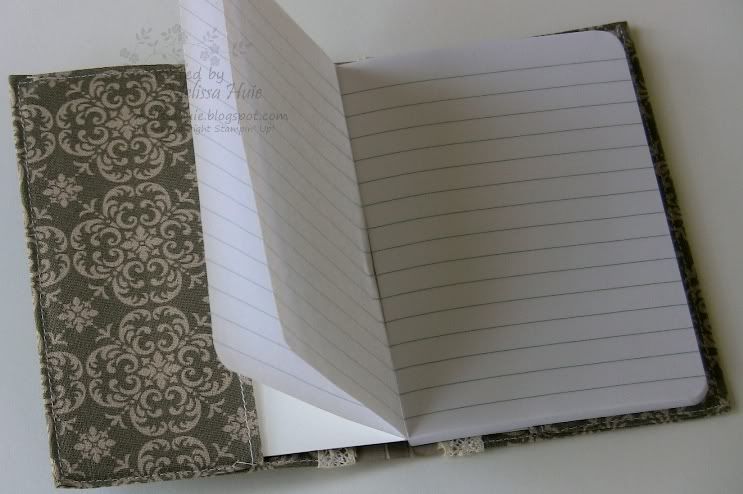
Here's the inside:
And here's the back, which I left pretty plain:
To create the tag, I first punched a piece of Naturals Ivory cardstock with the Decorative Label Punch (love this new punch!), then stamped the Music Notes wheel across twice with Crumb Cake ink. I then stamped "notes" in Early Espresso with the Sweet Shoppe Lowercase Alpha set (my new favorite alpha), and distressed the edges with Crumb Cake ink. Next, I adhered it to the front with Multipurpose Liquid Glue, and hand-sewed it to the front. Tip: It was so easy to create the straight line of holes with the Mat Pack and Paper Piercing Tool before sewing! I also hand-sewed the buttons.
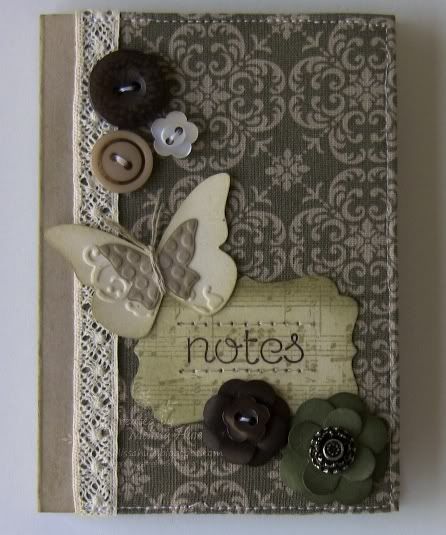
Aren't those flowers sweet? They were created using the Floral Fusion Sizzlits die, and Always Artichoke and Early Espresso cardstock. I curled the edges to give them a little extra dimension. A gorgeous Antique Brad finished off the bigger flower. :)
And of course, I had to add one of my butterflies. They seemed like the perfect finishing touch!
Well, I have to go cook dinner. Thanks for stopping by, and I hope you have a great weekend!
P.S. Don't forget that the Clearance Blitz ends on Monday, 10/18!
Mini Notebook Cover supplies:
Stamps: Sweet Shoppe Lower Alpha
Ink: Early Espresso, Always Artichoke and Crumb Cake
Paper: Crumb Cake, Naturals Ivory, Always Artichoke, and Early Espresso cardstock
Accessories/Tools: Deck the Halls Designer Fabric, Linen Thread, Chantilly Crochet Trim, Music Notes wheel, Antique Brad, Neutrals Designer Brads, Beautiful Wings Embosslits die, Floral Fusion Sizzlits die, Decorative Label Punch, Big Shot, sewing machine and thread
I started this project a few weeks ago, and then put it aside for a while. I finished it today!
I thought it would be cute to use Stampin' Up!'s beautiful new Designer Fabric to create a cover for a notebook. Well, I had some mini composition notebooks laying around that I found on clearance last year, so I created this...
I love how it turned out! I actually used the Deck the Halls Designer Fabric from the Holiday Mini Catalog... so as you can see, the fabric is more than just for the holidays! The mini notebook slides into the cover (like those old textbook covers you used to make out of paper bags for school), so it's replaceable when you fill up the notebook.
To start out, I measured and cut a piece of Crumb Cake cardstock to make a "folder". This just covers the outside of the notebook, leaving excess space around the edges to allow for the sewing. I attached some of the fabric to the front of the Crumb Cake cardstock using the Anywhere Glue Stick, then created a pocket on the inside to hold the notebook. I attached the Chantilly Crochet Trim, then sewed around the edges with my sewing machine (you can see a little blooper there on the bottom edge where my needle kind of skipped a little... oops! Hey, adds to the homemade look, right?). The edges of the fabric on the inside are finished, not left raw.
Here's the inside:
And here's the back, which I left pretty plain:
To create the tag, I first punched a piece of Naturals Ivory cardstock with the Decorative Label Punch (love this new punch!), then stamped the Music Notes wheel across twice with Crumb Cake ink. I then stamped "notes" in Early Espresso with the Sweet Shoppe Lowercase Alpha set (my new favorite alpha), and distressed the edges with Crumb Cake ink. Next, I adhered it to the front with Multipurpose Liquid Glue, and hand-sewed it to the front. Tip: It was so easy to create the straight line of holes with the Mat Pack and Paper Piercing Tool before sewing! I also hand-sewed the buttons.
Aren't those flowers sweet? They were created using the Floral Fusion Sizzlits die, and Always Artichoke and Early Espresso cardstock. I curled the edges to give them a little extra dimension. A gorgeous Antique Brad finished off the bigger flower. :)
And of course, I had to add one of my butterflies. They seemed like the perfect finishing touch!
Well, I have to go cook dinner. Thanks for stopping by, and I hope you have a great weekend!
P.S. Don't forget that the Clearance Blitz ends on Monday, 10/18!
Mini Notebook Cover supplies:
Stamps: Sweet Shoppe Lower Alpha
Ink: Early Espresso, Always Artichoke and Crumb Cake
Paper: Crumb Cake, Naturals Ivory, Always Artichoke, and Early Espresso cardstock
Accessories/Tools: Deck the Halls Designer Fabric, Linen Thread, Chantilly Crochet Trim, Music Notes wheel, Antique Brad, Neutrals Designer Brads, Beautiful Wings Embosslits die, Floral Fusion Sizzlits die, Decorative Label Punch, Big Shot, sewing machine and thread
Thursday, October 14, 2010
Patience, grasshopper...
So I scored a bunch of goodies from the Clearance Rack, and they were due to arrive today. Due to the influx of orders at SU!, it took a little extra time to ship... which was ok, I could wait. Then you know how anxious you get on the day you're expecting something really fun to arrive? So you can imagine me waiting, then finally seeing the message below. Aww... :(
Kind of weird to "forget" a package, eh? I just found it odd, but ah well, at least it's coming tomorrow . I can wait one more day! And I promise to have something awesome to show! :D
Til then... have a good night!
| 10/14/2010 | 8:17 P.M. | THE PACKAGE WAS MISSED AT THE UPS FACILITY, UPS WILL DELIVER ON THE NEXT BUSINESS DAY |
| 10/14/2010 | 6:23 A.M. | OUT FOR DELIVERY |
Kind of weird to "forget" a package, eh? I just found it odd, but ah well, at least it's coming tomorrow . I can wait one more day! And I promise to have something awesome to show! :D
Til then... have a good night!
Tuesday, October 12, 2010
Eternal Perfect Love
Hello!
I hope you have been having a great week so far!
Today's card uses this week's Mojo Monday sketch, and one of my favorite sentiments...
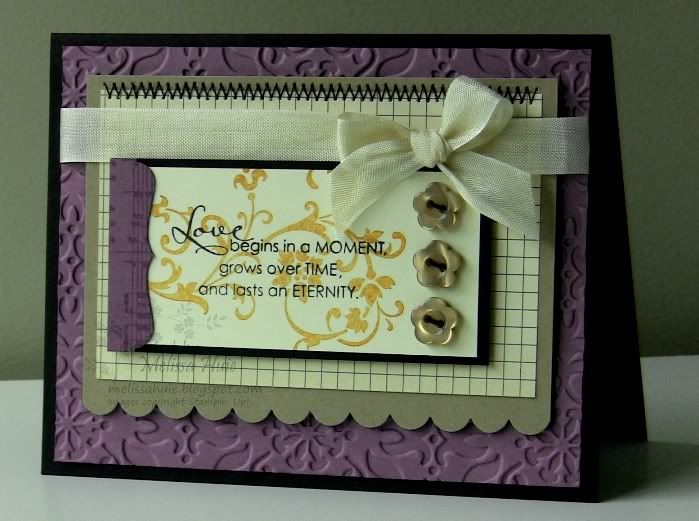
If you didn't know already, I simply ♥ this embossing folder, and you can get such a different look by doing what I did here - use the "debossed" side of the cardstock. And that sentiment... isn't it just lovely? I thought it deserved to be center-stage, with the beautiful flourish from the Elements of Style stamp set accenting it. (To lighten the stamped flourish, I inked up my stamp in More Mustard, then stamped onto scratch paper before stamping on my cardstock.)
Another thing I am really loving right now is the Music Notes wheel. Such a gorgeous accent on the left side there... can you tell I love how this card came out? LOL
My dear friend Barb asked how I go about making a card. Well, sometimes it is really just easier for me to start with a sketch... yes, I admit that sketches are your friend! Some people may believe that sketches are too stifling. Now see, this is where I think your creativity can really shine. As you work with a sketch, you may decide you want something in a different place, etc. Or, as I do very often, you can follow a sketch very literally. Sketches can be very time-saving (and sanity-saving, hehe)... I encourage you to give one a try!
Here are some of my favorite sketch websites:
If you find yourself struggling with a color combo, I encourage you to check out one of my favorite challenge sites:
I hope you have been having a great week so far!
Today's card uses this week's Mojo Monday sketch, and one of my favorite sentiments...
If you didn't know already, I simply ♥ this embossing folder, and you can get such a different look by doing what I did here - use the "debossed" side of the cardstock. And that sentiment... isn't it just lovely? I thought it deserved to be center-stage, with the beautiful flourish from the Elements of Style stamp set accenting it. (To lighten the stamped flourish, I inked up my stamp in More Mustard, then stamped onto scratch paper before stamping on my cardstock.)
Another thing I am really loving right now is the Music Notes wheel. Such a gorgeous accent on the left side there... can you tell I love how this card came out? LOL
My dear friend Barb asked how I go about making a card. Well, sometimes it is really just easier for me to start with a sketch... yes, I admit that sketches are your friend! Some people may believe that sketches are too stifling. Now see, this is where I think your creativity can really shine. As you work with a sketch, you may decide you want something in a different place, etc. Or, as I do very often, you can follow a sketch very literally. Sketches can be very time-saving (and sanity-saving, hehe)... I encourage you to give one a try!
Here are some of my favorite sketch websites:
- Stamping 411
- Mojo Monday
- Stampin' Addicts sketch challenges
- Pals Paper Arts (they switch between sketch, color and inspiration challenges)
If you find yourself struggling with a color combo, I encourage you to check out one of my favorite challenge sites:
I know there are tons more, but these are ones that I try and keep tabs on, and feed into my Google Reader.
And sometimes I just go back and forth and change my color choices a lot while creating something. It even helps to just walk away sometimes (sorry, I use this word a lot, apparently!), and come back later with a fresh(er) eye. There are times when I, too, get a little frustrated with where my project is going, or just don't have any creative mojo. When this happens, I may surf blogs and galleries for inspiration, or just play with some new products.
I am by no means an expert, but I hope that helps somewhat. If not, feel free to ask more. :) I love to help!
Well, thanks for stopping by! I hope you have a great rest of the day!
Eternal Perfect Love card supplies:
Stamps: Elements of Style, Occasional Quotes (Level 3 hostess set)
Ink: More Mustard, VersaMark ink, Jet Black StazOn
Paper: Basic Black, Crumb Cake, Perfect Plum, and Very Vanilla cardstock, Love Letter Designer Series Paper
Accessories/Tools: Vintage Wallpaper Textured Impressions Folder, Music Notes Wheel, Very Vanilla 1/2" Seam Binding, Crumb Cake Designer Buttons, Decorative Label Punch, Scallop Edge Border Punch, needle, sewing machine and black thread
Thursday, October 7, 2010
October issue of Paper Crafters Sampler coming soon!

Hi!
I just wanted to let you know that the October issue of Paper Crafters Sampler will be out on October 10th to all subscribers! (Available Oct. 11th for single-issue purchase.) It will be my first issue as a member of the design team, so I am excited!
(Remember to use my referral code if you subscribe -- PCSMH -- so they'll know I referred you! :) )
Here is a sneak peek!

Wednesday, October 6, 2010
Neighborhood Watch!
Good evening!
Of course, I didn't get too much done at the scrapbook retreat I attended, but I did have fun! :) Lots of laughs, and lots of memories.
I had mailed a bunch of things over so that I wouldn't have to check in a bag. When packing my return box, of course I didn't think to set my most-used tools/supplies aside, and NOT pack them. LOL
Dear Lisa was kind enough to take my things to the post office/UPS (thank you Lisa!!), and I will have them soon enough! Yay! (Ever realize how much you use something when you don't have it? hehe)
Anyway, here's a page I finished at the retreat.. yes, journaling and all! Maybe that's why I can usually get more done at a crop.. I usually save the title and journaling (and sometimes embellishing) for doing at home.
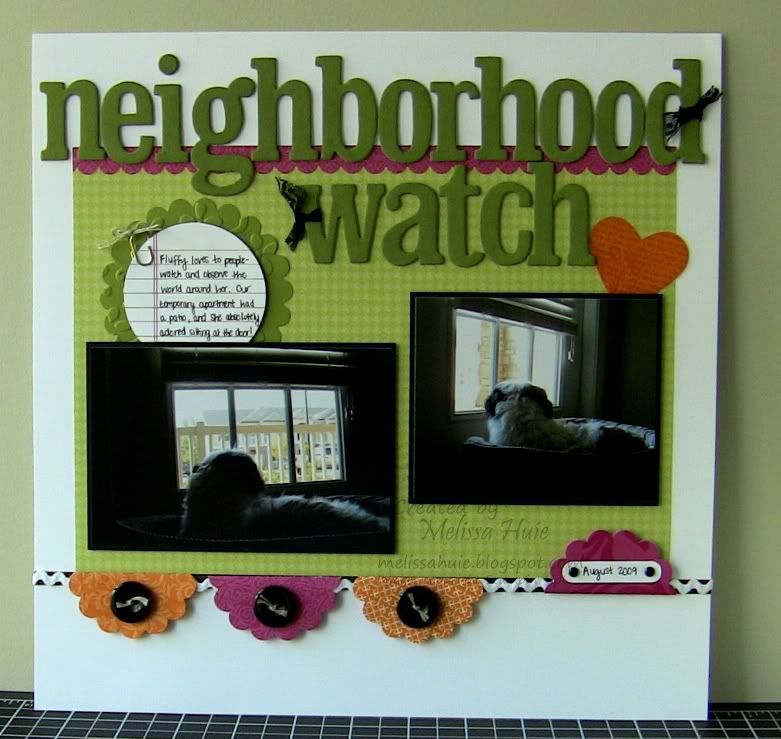
These pictures were taken at our temporary apartment. We stayed in a 2-bedroom unit with a patio while our building (which is actually across the parking lot, and you can see it in the first photo) was being finished. Fluffy loved being able to watch people and cars go by the window on the patio door. She's so nosy!
Yes, she'll even see a dog or person all the way on the other side of the complex/neighborhood, and she will stop what she's doing and watch them. It's quite possibly for this reason that she does so well when we have to leave her at the vet for her comprehensive exam... there's so much going on in front of her and she's too busy watching to miss us! lol
Lots of die-cutting and punching on this one. The little shapes at the bottom were created using the 2-3/8" Scallop Circle punch. After punching them out of the Sweet & Sour Specialty Designer Series Paper, I folded them in half, and kept them closed with Stampin' Dimensionals. I also attached them to the page with Dimensionals, and the white rick-rack (how do you really spell it, anyway? Not knowing kind of bothers me..) is threaded through them as well.
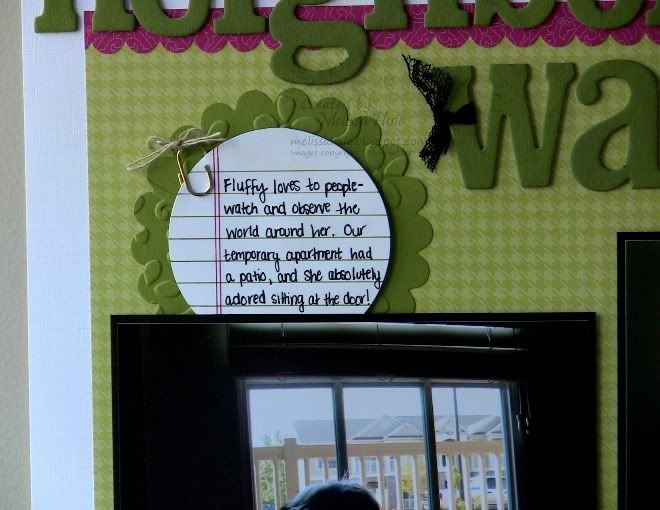
I created the journaling spot by first die-cutting a circle with the Circles #2 Originals die, then drew lines with Old Olive and Rose Red Stampin' Write markers. The scallop circle behind it is cut using the Scallop Circle #2 die, and embossed with the Elegant Bouquet Textured Impressions folder.
The journaling reads: "Fluffy loves to people-watch and observe the world around her. Our temporary apartment had a patio, and she absolutely adored sitting at the door!"
Here's a close-up picture of the journaling:
The rest of it you can probably figure out, but feel free and ask me about anything! Thanks for stopping by!
(By the way... you can get the Beachfront Ribbon Originals and the Loads of Letters chipboard pack on the Clearance Rack in my online store!)
Neighborhood Watch scrapbook page supplies (12x12):
Stamps: Punch Potpourri
Ink: VersaMark ink, Old Olive Craft Stampin' Pad
Paper: Pumpkin Pie, Basic Black, Old Olive, Whisper White, and Chocolate Chip cardstock, Sweet & Sour Specialty Designer Series Paper, Urban Oasis Designer Series Paper (retired)
Accessories/Tools: Beachfront Ribbon Originals (retired), On Board Loads of Letters (retired), Basic Black, Old Olive and Rose Red Stampin' Write Markers, Neutrals Designer Buttons, Basic Black Brads, Raven 1/2" Lace Trim, Paper Clip from Clips Assortment, Linen Thread, Elegant Bouquet Textured Impressions Folder, Stampin' Sponge, Scallop Circle #2 Bigz and Circles #2 Originals dies, and Full Heart, Scallop Edge, Word Window, and 2-3/8" Scallop Circle Punches
Of course, I didn't get too much done at the scrapbook retreat I attended, but I did have fun! :) Lots of laughs, and lots of memories.
I had mailed a bunch of things over so that I wouldn't have to check in a bag. When packing my return box, of course I didn't think to set my most-used tools/supplies aside, and NOT pack them. LOL
Dear Lisa was kind enough to take my things to the post office/UPS (thank you Lisa!!), and I will have them soon enough! Yay! (Ever realize how much you use something when you don't have it? hehe)
Anyway, here's a page I finished at the retreat.. yes, journaling and all! Maybe that's why I can usually get more done at a crop.. I usually save the title and journaling (and sometimes embellishing) for doing at home.
These pictures were taken at our temporary apartment. We stayed in a 2-bedroom unit with a patio while our building (which is actually across the parking lot, and you can see it in the first photo) was being finished. Fluffy loved being able to watch people and cars go by the window on the patio door. She's so nosy!
Yes, she'll even see a dog or person all the way on the other side of the complex/neighborhood, and she will stop what she's doing and watch them. It's quite possibly for this reason that she does so well when we have to leave her at the vet for her comprehensive exam... there's so much going on in front of her and she's too busy watching to miss us! lol
Lots of die-cutting and punching on this one. The little shapes at the bottom were created using the 2-3/8" Scallop Circle punch. After punching them out of the Sweet & Sour Specialty Designer Series Paper, I folded them in half, and kept them closed with Stampin' Dimensionals. I also attached them to the page with Dimensionals, and the white rick-rack (how do you really spell it, anyway? Not knowing kind of bothers me..) is threaded through them as well.
I created the journaling spot by first die-cutting a circle with the Circles #2 Originals die, then drew lines with Old Olive and Rose Red Stampin' Write markers. The scallop circle behind it is cut using the Scallop Circle #2 die, and embossed with the Elegant Bouquet Textured Impressions folder.
The journaling reads: "Fluffy loves to people-watch and observe the world around her. Our temporary apartment had a patio, and she absolutely adored sitting at the door!"
Here's a close-up picture of the journaling:
The rest of it you can probably figure out, but feel free and ask me about anything! Thanks for stopping by!
(By the way... you can get the Beachfront Ribbon Originals and the Loads of Letters chipboard pack on the Clearance Rack in my online store!)
Neighborhood Watch scrapbook page supplies (12x12):
Stamps: Punch Potpourri
Ink: VersaMark ink, Old Olive Craft Stampin' Pad
Paper: Pumpkin Pie, Basic Black, Old Olive, Whisper White, and Chocolate Chip cardstock, Sweet & Sour Specialty Designer Series Paper, Urban Oasis Designer Series Paper (retired)
Accessories/Tools: Beachfront Ribbon Originals (retired), On Board Loads of Letters (retired), Basic Black, Old Olive and Rose Red Stampin' Write Markers, Neutrals Designer Buttons, Basic Black Brads, Raven 1/2" Lace Trim, Paper Clip from Clips Assortment, Linen Thread, Elegant Bouquet Textured Impressions Folder, Stampin' Sponge, Scallop Circle #2 Bigz and Circles #2 Originals dies, and Full Heart, Scallop Edge, Word Window, and 2-3/8" Scallop Circle Punches
Tuesday, October 5, 2010
Clearance Rack Blitz!
Hello!
I just wanted to let you all know that Stampin' Up! is having a Clearance Rack Blitz from now through October 18th. They're adding over two hundred more discontinued items - some at up to 80% off - to help make room in the Distribution Center for new products!
To order from me, click on over to my website, http://melissahuie.stampinup.net, and click "SHOP NOW" in the upper right. The clearance rack link can be then found on the left! Happy shopping! :)
Wednesday, September 29, 2010
Exciting news!
Hi!
Sorry to leave you hanging the other day!
Here's my news... Melanie has invited me to become part of the Paper Crafters Sampler design team!
Paper Crafters Sampler is an online publication featuring beautiful projects using Stampin' Up! products. There is a different theme each month, providing a wealth of timely ideas.
You can check out PCS and the design team on my sidebar. If you subscribe, be sure to use my code, which is PCSMH.. that way, they'll know I referred you! :) My first project will be featured in the October issue, titled "The Witching Hour".
Tuesday, September 28, 2010
Thinking of You pennants card
Hello!
Do you ever create a card that makes you happy to look at it? Today's card would be an example of that for me! I hope that it makes the recipient feel the same way! :)
I pulled inspiration from Stampin' Celebration's challenge this week:

...and incorporated this week's Mojo Monday sketch into my card...

I loved the pennants in the Stampin' Celebration inspiration photo! They were very easy to create using the Modern Label Punch! I simply inserted my cardstock straight edge first, looking through the underside of the punch. I only inserted the cardstock a little more than 1/3 of the way in, and punched. I then folded a lip into the punch-out, about 1/8" in, and glued each one around the Linen Thread. I wanted to add a little texture, so I ran the whole thing through my Square Lattice Textured Impressions folder. I love how it turned out, and it's a great way to use up scraps!
After placing the butterfly with a mini glue dot, I thought it'd be really cute to create a path using some Linen Thread (which by the way, is one of those accessories I can't live without!). Just a couple of tiny dots of Crystal Effects keeps the loop perfectly in place!
I do have some exciting news that I will share soon! Thanks for stopping by!
Thinking of You pennant card supplies:
Stamps: Thoughts & Prayers
Ink: Soft Suede
Paper: Crumb Cake, Soft Suede, Whisper White, Marina Mist, Pink Pirouette, Pear Pizzazz, and Daffodil Delight cardstock, In Color Patterns Designer Series Paper (Level 1 hostess pack)
Accessories/Tools: Modern Label Punch, Marina Mist 5/8" Satin Ribbon, Linen Thread, Beautiful Wings Embosslits die, Soft Suede and Pear Pizzazz Stampin' Write Markers, Crystal Effects, Neutrals Designer Buttons
Do you ever create a card that makes you happy to look at it? Today's card would be an example of that for me! I hope that it makes the recipient feel the same way! :)
I pulled inspiration from Stampin' Celebration's challenge this week:

...and incorporated this week's Mojo Monday sketch into my card...
I loved the pennants in the Stampin' Celebration inspiration photo! They were very easy to create using the Modern Label Punch! I simply inserted my cardstock straight edge first, looking through the underside of the punch. I only inserted the cardstock a little more than 1/3 of the way in, and punched. I then folded a lip into the punch-out, about 1/8" in, and glued each one around the Linen Thread. I wanted to add a little texture, so I ran the whole thing through my Square Lattice Textured Impressions folder. I love how it turned out, and it's a great way to use up scraps!
After placing the butterfly with a mini glue dot, I thought it'd be really cute to create a path using some Linen Thread (which by the way, is one of those accessories I can't live without!). Just a couple of tiny dots of Crystal Effects keeps the loop perfectly in place!
I do have some exciting news that I will share soon! Thanks for stopping by!
Thinking of You pennant card supplies:
Stamps: Thoughts & Prayers
Ink: Soft Suede
Paper: Crumb Cake, Soft Suede, Whisper White, Marina Mist, Pink Pirouette, Pear Pizzazz, and Daffodil Delight cardstock, In Color Patterns Designer Series Paper (Level 1 hostess pack)
Accessories/Tools: Modern Label Punch, Marina Mist 5/8" Satin Ribbon, Linen Thread, Beautiful Wings Embosslits die, Soft Suede and Pear Pizzazz Stampin' Write Markers, Crystal Effects, Neutrals Designer Buttons
Tuesday, September 21, 2010
Friend to friend silhouette card
Hello!
I hope you had a great weekend!
Today I have a quick and easy card to show you. This week's Mojo Monday sketch is very clean and simple, yet could be dressed up if you wanted to do so. For my card, I also drew from ColourQ's challenge this week...

Repetition is very pleasing to the eye, so it's a great choice in designing a card. You can see that in my card here, I repeated the stamped image, as well as the small flowers below it. I am growing quite fond of sewing on paper... if you're a regular to my blog, I'm sure you already know that! :)
Well, I need to get going. Still have a lot to do with getting organized. Thanks for stopping by!
Friend to friend silhouette card supplies:
Stamps: Pocket Silhouettes
Ink: Peach Parfait, Poppy Parade and Old Olive
Paper: Old Olive, So Saffron, Whisper White, Peach Parfait, and Poppy Parade cardstock, In Color Designer Series Paper (Level 1 hostess)
Accessories/Tools: Trio Flower (retired), Scallop Trim Border, 1-1/4" Circle, and 1-3/8" Circle Punches, Old Olive 5/8" Satin Ribbon, Metallic Brads, sewing machine and thread
I hope you had a great weekend!
Today I have a quick and easy card to show you. This week's Mojo Monday sketch is very clean and simple, yet could be dressed up if you wanted to do so. For my card, I also drew from ColourQ's challenge this week...
Repetition is very pleasing to the eye, so it's a great choice in designing a card. You can see that in my card here, I repeated the stamped image, as well as the small flowers below it. I am growing quite fond of sewing on paper... if you're a regular to my blog, I'm sure you already know that! :)
Well, I need to get going. Still have a lot to do with getting organized. Thanks for stopping by!
Friend to friend silhouette card supplies:
Stamps: Pocket Silhouettes
Ink: Peach Parfait, Poppy Parade and Old Olive
Paper: Old Olive, So Saffron, Whisper White, Peach Parfait, and Poppy Parade cardstock, In Color Designer Series Paper (Level 1 hostess)
Accessories/Tools: Trio Flower (retired), Scallop Trim Border, 1-1/4" Circle, and 1-3/8" Circle Punches, Old Olive 5/8" Satin Ribbon, Metallic Brads, sewing machine and thread
Friday, September 17, 2010
A very vintage "Just Because" card!
Happy Friday!!
So... guess what?? I made a card!
Yes, that's right. I know it's been too long, and I apologize! There are various reasons for this, but I'll try and be a better blogger. :)
Well, I received some new Stampin' Up! goodies not too long ago, and I had been itching to make something with them! I had to find my stamping mojo though, so I went looking through some challenge blogs. This week's challenge from Stampin' Celebration prompted me to play, as it uses such a gorgeous color combo!
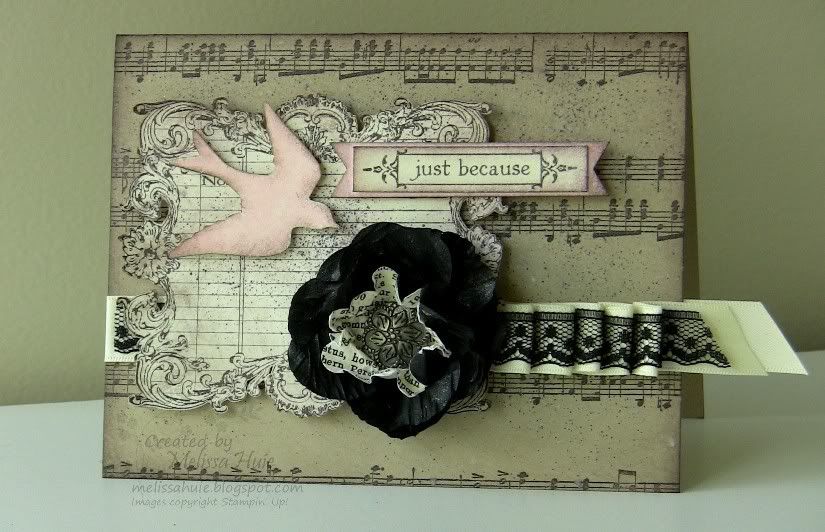
So much fun, eh? Let me tell you about all these awesome goodies!
The background was created using the Music Notes wheel and Early Espresso ink. Isn't that new wheel just gorgeous? It is one of my must-have items from the Idea Book & Catalog, and I was so happy when I got my little hands on it! Lining up the multiple images was a breeze with the Wheel Guide!
I stamped the beautiful image from the Notably Ornate stamp set (another must-have), cut it out, and distressed it (along with everything else on this card). I spritzed over different elements using the Color Spritzer and the Basic Black Stampin' Write marker, and when the card was all finished, I sprayed the front all over with lots of Vanilla Shimmer Smooch Spritz. It's so beautifully sparkly in real life. :)
The new Raven Lace Trim from the new Holiday Mini Catalog looks just gorgeous layered over the satin ribbon. I created the pleating effect using Mini Glue Dots (one of my favorite ways to add interest to ribbon)... I just love how it turned out with the lace!
See that pretty flower? I made that using the new waffle paper! It was so easy to create! I simply punched out a few flowers using the Fancy Flower XL punch and layered them slightly off from each other (not lining them up), scrunching them up a little. Next, I punched out a scalloped circle from the Newsprint Designer Series Paper (one of my favorite packs!), sprayed it with water on both sides to loosen the fibers, and crumpled it up. I then layered it on top of the waffle paper flowers and punched a hole in the middle. The Antique Brad just works so wonderfully as a flower center... don't you think?
Tip: When punching the waffle paper, be sure to first layer some cardstock underneath, and punch through both layers. I like to use either Whisper White or Very Vanilla. This ensures that you have a nice, clean cut through your waffle paper!
Ok, gotta run! I need to start packing and organizing my stuff for the retreat I'm going to later this month. Thanks for stopping by!
"Just Because" vintage card supplies:
Stamps: Notably Ornate
Ink: Early Espresso
Paper: Crumb Cake, Pink Pirouette and Very Vanilla cardstock, Newsprint Designer Series Paper
Accessories/Tools: Music Notes Wheel, Vanilla Shimmer Smooch Spritz, Color Spritzer, Basic Black Stampin' Write Marker, Stampin' Sponge, 1-3/8" Scallop Circle and Fancy Flower Punches, Raven Lace Trim and Very Vanilla 5/8" Satin Ribbon, Antique Brad, Waffle Paper Assortment #2
So... guess what?? I made a card!
Yes, that's right. I know it's been too long, and I apologize! There are various reasons for this, but I'll try and be a better blogger. :)
Well, I received some new Stampin' Up! goodies not too long ago, and I had been itching to make something with them! I had to find my stamping mojo though, so I went looking through some challenge blogs. This week's challenge from Stampin' Celebration prompted me to play, as it uses such a gorgeous color combo!
So much fun, eh? Let me tell you about all these awesome goodies!
The background was created using the Music Notes wheel and Early Espresso ink. Isn't that new wheel just gorgeous? It is one of my must-have items from the Idea Book & Catalog, and I was so happy when I got my little hands on it! Lining up the multiple images was a breeze with the Wheel Guide!
I stamped the beautiful image from the Notably Ornate stamp set (another must-have), cut it out, and distressed it (along with everything else on this card). I spritzed over different elements using the Color Spritzer and the Basic Black Stampin' Write marker, and when the card was all finished, I sprayed the front all over with lots of Vanilla Shimmer Smooch Spritz. It's so beautifully sparkly in real life. :)
The new Raven Lace Trim from the new Holiday Mini Catalog looks just gorgeous layered over the satin ribbon. I created the pleating effect using Mini Glue Dots (one of my favorite ways to add interest to ribbon)... I just love how it turned out with the lace!
See that pretty flower? I made that using the new waffle paper! It was so easy to create! I simply punched out a few flowers using the Fancy Flower XL punch and layered them slightly off from each other (not lining them up), scrunching them up a little. Next, I punched out a scalloped circle from the Newsprint Designer Series Paper (one of my favorite packs!), sprayed it with water on both sides to loosen the fibers, and crumpled it up. I then layered it on top of the waffle paper flowers and punched a hole in the middle. The Antique Brad just works so wonderfully as a flower center... don't you think?
Tip: When punching the waffle paper, be sure to first layer some cardstock underneath, and punch through both layers. I like to use either Whisper White or Very Vanilla. This ensures that you have a nice, clean cut through your waffle paper!
Ok, gotta run! I need to start packing and organizing my stuff for the retreat I'm going to later this month. Thanks for stopping by!
"Just Because" vintage card supplies:
Stamps: Notably Ornate
Ink: Early Espresso
Paper: Crumb Cake, Pink Pirouette and Very Vanilla cardstock, Newsprint Designer Series Paper
Accessories/Tools: Music Notes Wheel, Vanilla Shimmer Smooch Spritz, Color Spritzer, Basic Black Stampin' Write Marker, Stampin' Sponge, 1-3/8" Scallop Circle and Fancy Flower Punches, Raven Lace Trim and Very Vanilla 5/8" Satin Ribbon, Antique Brad, Waffle Paper Assortment #2
Wednesday, September 1, 2010
The Holiday Mini Catalog is here!
And it's just filled with all sorts of crafty goodness! I can't wait to get my first shipment from this catalog (hopefully next week!)... want to see it? Of course you do! :)

If you are in need of a Holiday Mini catalog, please let me know. I'd love to send you one!
If you are in need of a Holiday Mini catalog, please let me know. I'd love to send you one!
Monday, August 30, 2010
Fluffy & bedtime
Hello!
I hope you had a good weekend!
Fluffy, as you probably know, is our baby. She sleeps on our bed with us. I never tire of displays of her intelligence! She knows what "goodnight" and "time to go to sleep" means - she'll run into the bedroom and wait for us to put her on the bed, usually standing on her hind legs and putting her paws up on the side of it. Well, these pictures on this scrapbook page just show that, from our point of view. She gets "mad" if we don't get her up on the bed when she wants to come up. The poor little thing is too short to climb the bed herself - we have a bed rail, then a thick box spring, then a thick mattress with a pillow-top. So you can imagine how high it is!
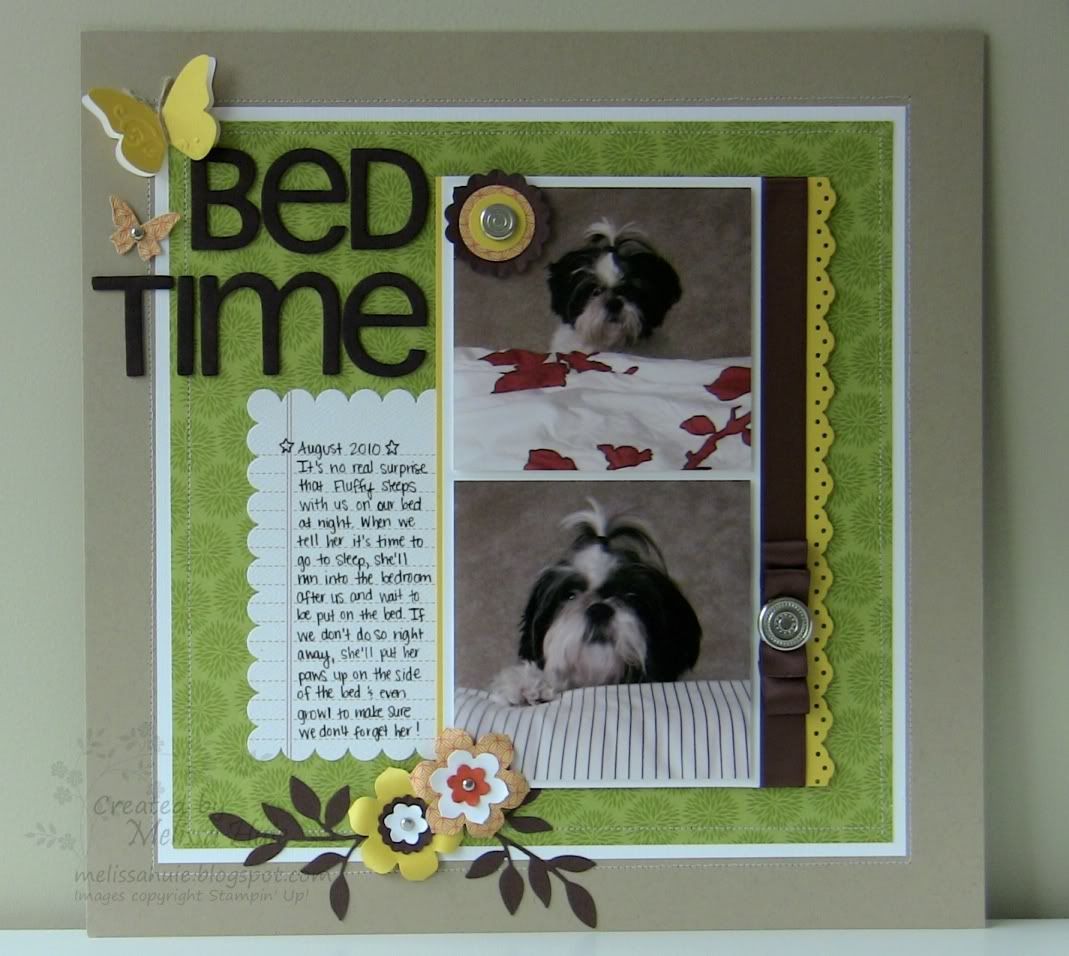
We've tried to get her to run and jump onto the bed, but to no avail. She actually surprised us one day by getting up there, but she had a lot of motivation, I guess, from us holding her toy hostage on the bed. :)
The journaling reads: "It's no real surprise that Fluffy sleeps with us on our bed at night. When we tell her it's time to go to sleep, she'll run into the bedroom after us and wait to be put on the bed. If we don't do so right away, she'll put her paws up on the side of the bed and even growl to make sure we don't forget her!"
Hope the photo looks ok. Since I've adjusted my blog design, I'm able to put a larger picture on here. :)
Thanks for stopping by!
Bedtime scrapbook page supplies:
Ink: Chocolate Chip Craft Stampin' Pad
Paper: Crumb Cake, Chocolate Chip, Whisper White, Daffodil Delight, and Tangerine Tango cardstock, Haiku Designer Series Paper and The Write Stuff Specialty Designer Series Paper (both retired)
Accessories/Tools: Loads of Letters On Board Chipboard (retired), Chocolate Chip 5/8" Satin Ribbon, Linen Thread, Basic Black Stampin' Write Journaler, Beautiful Wings Embosslits die, Little Leaves Sizzlits die, Birds & Blooms Sizzlits, Metallic Brads, Circle Designer Brads (retired), sewing machine and thread, and Eyelet Border, 1" Circle and 3/4" Circle Punches, Sponge Dauber
I hope you had a good weekend!
Fluffy, as you probably know, is our baby. She sleeps on our bed with us. I never tire of displays of her intelligence! She knows what "goodnight" and "time to go to sleep" means - she'll run into the bedroom and wait for us to put her on the bed, usually standing on her hind legs and putting her paws up on the side of it. Well, these pictures on this scrapbook page just show that, from our point of view. She gets "mad" if we don't get her up on the bed when she wants to come up. The poor little thing is too short to climb the bed herself - we have a bed rail, then a thick box spring, then a thick mattress with a pillow-top. So you can imagine how high it is!
We've tried to get her to run and jump onto the bed, but to no avail. She actually surprised us one day by getting up there, but she had a lot of motivation, I guess, from us holding her toy hostage on the bed. :)
The journaling reads: "It's no real surprise that Fluffy sleeps with us on our bed at night. When we tell her it's time to go to sleep, she'll run into the bedroom after us and wait to be put on the bed. If we don't do so right away, she'll put her paws up on the side of the bed and even growl to make sure we don't forget her!"
Hope the photo looks ok. Since I've adjusted my blog design, I'm able to put a larger picture on here. :)
Thanks for stopping by!
Bedtime scrapbook page supplies:
Ink: Chocolate Chip Craft Stampin' Pad
Paper: Crumb Cake, Chocolate Chip, Whisper White, Daffodil Delight, and Tangerine Tango cardstock, Haiku Designer Series Paper and The Write Stuff Specialty Designer Series Paper (both retired)
Accessories/Tools: Loads of Letters On Board Chipboard (retired), Chocolate Chip 5/8" Satin Ribbon, Linen Thread, Basic Black Stampin' Write Journaler, Beautiful Wings Embosslits die, Little Leaves Sizzlits die, Birds & Blooms Sizzlits, Metallic Brads, Circle Designer Brads (retired), sewing machine and thread, and Eyelet Border, 1" Circle and 3/4" Circle Punches, Sponge Dauber
Subscribe to:
Posts (Atom)