As promised, I'll be taking a closer look at the projects I showed during the Stampin' Addicts Birthday Blog Hop this past weekend. First, the card I made:

I used the fun layout from Mojo Monday last week, as well as ColourQ's colors last week. The cupcake and balloon were paper-pieced with Designer Series Paper from the Pink Flamingo pack, and the cupcake was also watercolored with ink pads and a Blender Pen. The sentiment was inked up with the Real Red and Brilliant Blue markers and stamped. I used the coordinating Cupcakes wheel with the Real Red ink pad to create a matching Whisper White envelope. SU's Whisper White and Very Vanilla envelopes are great for stamping on, with the same smooth surface as the cardstock. Many of the stamp sets have coordinating wheels, and it just adds the extra little touch to your envelope for your recipient!
Cupcake Celebration card:
Stamps: Crazy for Cupcakes, On Your Birthday
Ink: Jet Black StazOn, YoYo Yellow, Real Red and Tempting Turquoise Classic Stampin' Pads
Paper: Kraft, Brilliant Blue, Whisper White, Real Red, and YoYo Yellow cardstock, Pink Flamingo Designer Series Paper
Accessories/Tools: Real Red, Tempting Turquoise and Brilliant Blue Stampin' Write markers, Blender Pen, Whisper White satin ribbon, Linen Thread, Pewter Mini Library Clip, Cupcakes wheel, and Scallop Trim Border, 1" Circle and 1-1/4" Circle punches
My next project was the treat holder made with the large cupcake stamp, Simple Birthday Thanks:

If you have seen the image of the stamp in the catalog, you know that it actually has a little "thank you" message in the body of the cupcake. It was meant for a child to use to make "thank you" cards, with blanks to fill in to personalize them. Well, I don't see myself needing that part of the stamp, but I just loved the cupcake itself, so when I received the stamp I used my craft knife to carefully cut out the message. I kept it in case I needed it one day, but now I don't have to worry about only inking the cupcake when I want to use just that part!
I started out the treat holder by stamping the full cupcake in Chocolate Chip Classic ink on Very Vanilla cardstock twice. I also stamped partial images (using strategic placement of the stamp onto the paper) onto the Old Olive piece of Sweet Pea Designer Series Paper and onto Real Red cardstock. I cut these out with my Paper Snips (love these for cutting images!) and paper-pieced the image onto the Very Vanilla cupcakes. I colored in the stem of the cherry with my Old Olive marker, and the sprinkles with my Regal Rose marker. I used a cotton swab to apply Champagne Mist Shimmer Paint to the sprinkles to give an extra little sparkle! I set these aside while I created the box in between them...
First, start with a piece of cardstock measuring 8.5" x 3". Score according to the photo below:

Then snip triangles out along the lower scored line to form "flaps", so the box will be easier to put together. Cut the smallest flap off the left side and place a double-sided strong adhesive (such as Sticky Strip) as shown:

Ok, now the next set of photos I placed in a collage to cut down on the number of photos that needed to load here...

Now, insert your ribbon of choice through the eyelets and tie to create your handle. Adhere your cupcakes to each side of the box using Sticky Strip, and finish decorating as desired. I added a picture also to show where the box sits in relation to the cupcakes.


You can adjust the box size if you want a bigger one - I did not want my box to show past the cupcakes when looking at it from the front.
Cupcake treat holder:
Stamps: Simple Birthday Thanks
Ink: Chocolate Chip Classic Stampin' Pad
Paper: Very Vanilla, Old Olive and Real Red cardstock, Sweet Pea Designer Series Paper pad
Accessories/Tools: Old Olive and Regal Rose Stampin' Write markers, Real Red polka-dot grosgrain ribbon, Chocolate Chip 1-1/4" striped grosgrain ribbon, Champagne Mist Shimmer Paint, Pewter Jumbo Eyelets, Crop-a-dile, Sticky Strip
Ok, now one last tutorial! Here is the little box I made that holds an actual cupcake..

This box is very easily made with the SU! exclusive Scallop Envelope Bigz die! Start by using the die to cut out 4 of these...

Then you will need to cut off the side flaps from two of them (shown in the back):

Adhere all of the envelopes together along the sides as follows: "envelope-envelope with no side flaps-envelope-envelope with no side flaps". Confusing, I know, but see if you can figure out what I mean from this picture:
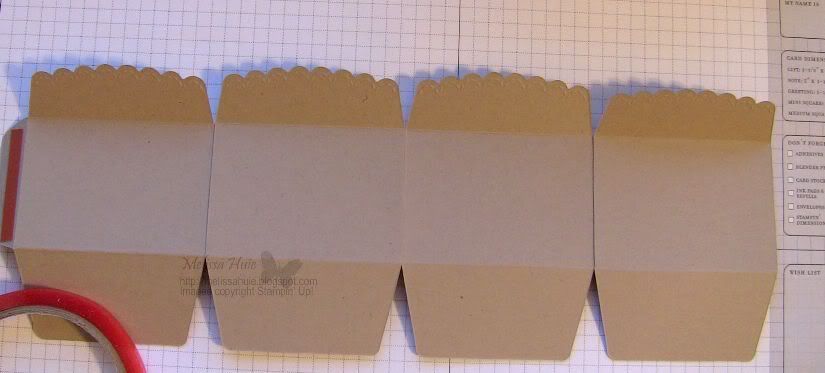
You'll see that the envelope on the left has side flaps, and the one on the far right does not.
Ok, next you'll want to use Sticky Strip to adhere the box sides together, then to close the bottom flaps to create your box.

Cut a piece of cardstock measuring 3-1/8" square, and adhere this inside the box bottom. This will reinforce your box.
Now you can decorate your box as you wish! I adhered a strip of Sweet Pea Designer Series Paper, then glued the top flaps down over the DSP. I then tied some Whisper White satin ribbon around the box and created a little tag out of the Modern Label and Word Window punches.

Next, you'll want to create an insert that will hold the cupcake in place. I cut a piece of Soft Suede cardstock 4-3/4" square, scoring it all around at 3-7/8". I then used my Circle Scissors Plus to cut a 2-1/4" circle out of the center. The lines on the glass cutting mat and the Circle Scissors helped me line up my circle perfectly in the center of my cardstock. Please note that you need to use temporary adhesive on your glass cutting mat to keep the cardstock from moving!

You may find it easier to snip from the edge of the cardstock to the score line to create small flaps to form your insert. (Ask me if you'd like a picture of the flaps)

At this size, the insert fits perfectly in the box, as does a regular-sized cupcake!

I created a cover out of Medium Window Sheets, but I can't seem to find it. So when I do, I'll be sure to post that!
Cupcake holder box:
Stamps: Teeny Tiny Wishes
Ink: Chocolate Chip Classic Stampin' Pad
Paper: Kraft, Soft Suede, Whisper White, and Pretty in Pink cardstock, Sweet Pea Designer Series Paper pad
Accessories/Tools: Whisper White satin ribbon, So Saffron Flower Designer Brad, Scallop Envelope Bigz die, Modern Label and Word Window punches, Sticky Strip
Hope you enjoyed my tutorials! Please feel free to contact me if you have any questions about anything! :)
Hope you enjoyed my tutorials! Please feel free to contact me if you have any questions about anything! :)


Thanks for the tutorials.
ReplyDeleteAwesome! Thanks for showing us how!!!
ReplyDeleteWOW! Luuurrvvvee that cupcake treat holder. Your color choices really made it pop! Perfect for birthday parties. Great Job!
ReplyDeletewhat great ideas and tutorials, not to mention wonderful colors, tfs!
ReplyDeleteAwesome projects, Melissa! You Rock!
ReplyDelete